Even though some informations are valid independently of the OS, this documentation was written for windows.
gitshould be installed, and we recommend the use of IntelliJ for Java and PyCharm for Python development
¶ But why ?
Having your repositories version controlled allows for reusability and reproducibility. It is essential for collaborative work (and less if you are sure than you will be the only one working on your project). It can also help to find bugs.
¶ Git repository naming conventions
Please follow these conventions when creating a repository containing code
| Type | Name | Short Name |
|---|---|---|
| ActionBars | {name} ActionBar | ijab-... |
| Plugins | {name} Plugin | ijp-... |
| Macros | {name} Macro | ijm-... |
| Scripts | {name } Script | ijs-... |
| XTensions | {name} XT | xt-... |
| Python Projects | {name} Python | py-... |
Use dash (-) as separators, and non capital letters. For instance ijp-bigdataviewer-segment.
¶ BIOP repositories available in maven.scijava.org
List of repositories
¶ Git Remote Management
We are using github.
¶ GitHub BIOP Account
Oli created an account for the BIOP on GitHub. That way our public work is more visible and more professional. All BIOP members are administrators and can add more people and create repositories.
¶ Git remove directories with gitignore
- add the folder to remove in the gitignore file
- push your commit to github
- if the directory has been push on github even if the gitignore was configured, untrack the directory using the lines below (see the full post if you need more)
git rm -r --cached some-directory
git commit -m 'Remove the now ignored directory "some-directory"
git push origin master
¶ Java repositories
We develop at the BIOP several packages designed for Fiji and QuPath, thus being Java based.The section below describes version control and continuous integration for tools that belong to the scijava ecosystem (ImageJ/Fiji, and QuPath).
¶ Scijava Maven, Github actions and reproducible repository releases
The procedure described below will help you to:
- make a reproducible piece of code
- allow others to use your code easily
The procedure described below is aimed at making java repositories in the scijava ecosystem. Other things exist for python, c, etc.
Briefly, you will have to abide by certain rules when creating a repository. These rules will allow github, via github actions, to build your repo for each commit, potentially test it (if you put tests), and also make its current state (SNAPSHOT versions) and releases available through the maven.scijava.org web server.
What this does NOT do, is handling Fiji update sites - manual uploads are still required.
The BIOP organization has 'secrets' shared with scijava maven, and thus all repos created and present in the BIOP organization can use CI. This is not the case if your repository is on your personal github account. So to enable CI on a personal, you have to give ownership to BIOP before (otherwise you need to contact a scijava administrator).
To change the ownership of a github repository, go to the github
Settingstab and chooseTransfer ownershipfrom theDanger Zone.
Enter "BIOP". On your local computer, update your repository's remote url :
$ git remote set-url origin <biop_remote_url>
¶ For Fiji: full automation via Scijava Scripts
The procedure for CI is explained below. Some parts have to be setup once, some parts one time for each repository (enabling CI for a repo), and some actions have to be performed each time you want to publish a release, once CI has been enabled.
¶ To do once on your computer: clone the scijava-scripts repository once at the proper file hierarchy location
The repository https://github.com/scijava/scijava-scripts contains all the useful scripts used for continuous integration. These scripts will have to be executed in order to enable CI for a repository or to make a new release. This repository needs to be present locally in your computer.
- run
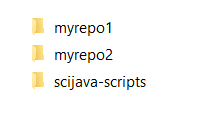
git clone https://github.com/scijava/scijava-scriptsand - it will ease the execution of these scripts - put the scripts repo at the same hierarchy as all the other repos you want to enable CI:
¶ To do once on your computer: add software to the Path System environment variable
Add to the Path system environment variable the :
- Java jdk (check
C:\Program Files\Jetbrains\IntelliJ\Java\Jdk\orC:\Program Files\Java\jdk1.8.0_xxx) - Maven: (you can find one in your intellij installation
C:\Program Files\JetBrains\IntelliJ IDEA Community Edition YYYY.M\plugins\maven\lib\maven3\bin)
Add or edit a JAVA_HOME system environment variable that points to:
- Java jdk (check
C:\Program Files\Jetbrains\IntelliJ\Java\Jdk\orC:\Program Files\Java\jdk1.8.0_xxx)
You can do that in git bash with a line like:
export JAVA_HOME="C:\Users\chiarutt\.jdks\corretto-1.8.0_392"
and confirm that the new variable is set (at least for this session of bash) with
echo $JAVA_HOME
¶ To do for each repository once, in order to enable CI
Preparation before enabling CI
Here we assume that you created a java repository that uses a scijava template (maven based), like https://github.com/BIOP/ijp-template-ij2 or https://github.com/imagej/example-imagej2-command
Mainly, the pom.xml file needs to be tidy and ready for CI. A good way to check that it is the case, is to look for a good pom example file. For instance check the one in https://github.com/BIOP/ijp-kheops, and modify your pom accordingly.
A few things to check:
-
All dependencies should be publicly available, either through scijava maven (https://maven.scijava.org/ - mainly imagej stuff) or through maven central (https://search.maven.org/), or through another publicly available maven repository.
-
The dependency versions should : not be a SNAPSHOT dependency (because SNAPSHOTS can be overriden, the build is not reproducible) + their versions should be declared in the properties part of the pom.xml file of the repository.
DO NOT WRITE:
  <dependency>
      <groupId>org.reflections</groupId>
      <artifactId>reflections</artifactId>
      <version>0.9.11</version>
   </dependency>
WRITE:
  <properties>
      ...
      <reflections.version>0.9.11</reflections.version>
  </properties>

...

  <dependency>
      <groupId>org.reflections</groupId>
      <artifactId>reflections</artifactId>
      <version>${reflections.version}</version>
   </dependency>
This allows the versions to be managed / checked and overriden if necessary by scijava maven plugins.
- Take care with javadoc. To test if you did not make any mistake with javadoc, type
mvn javadoc:javadocin the intellij terminal (this can take a while). Then correct all the errors (this can take a while also). Warning can be ignored ( thus you can typemvn javadoc:javadoc | grep errorto avoid displaying warnings, but that works only with git bash, not in the windows terminal). Usually you have issues with special characters (<,>,@, etc...). You need to replace them with their html representation&whatever, see https://dev.w3.org/html5/html-author/charref)
Actionify - enable CI through Github Actions
you may want to update your
.gitignorefile. Again, check the.gitignorefile of https://github.com/BIOP/ijp-kheops. You can directly copy paste it into your repo.
Windows may have issues with file permission trakcing. The best is to not track them. For that, execute locally:
git config core.fileMode false
- Once this is done, you need to run
github-actionify.shin simulation mode to see if everything looks right:
- in an explorer window, go to the folder where the pom file of your repo is located. Right-click and execute
git bash here. Then type../scijava-scripts/github-actionify.sh.
You may have some issues displayed that you need to fix. If everything looks alright, you can run this command 'for real':
- run
../scijava-scripts/github-actionify.sh -fto run the actionification for real - push the repo on github - which will contain newly generated commits for CI. Then Github will run the build and the badge on the github repo will turn green or red depending on the outcome. You can click on the badge to see the build live, and to check if there's any solvable error if the build was not successful
¶ To do for each repository release
Once your repo has been actionified, each time you want to push a release, you need to:
- in an explorer window, go to the folder where the pom file of your repo is located. Right-click and execute
git bash here. Then type../scijava-scripts/release-version.sh. You are asked which version that you want to release. Usually, you are working on a version like v1.2.3-SNAPSHOT, and the script will release the version v1.2.3 and will automatically commit modification in order to update your repo to v1.2.4-SNAPSHOT, where you can continue your development. If this doesn't work, push to GitHub and ask for help!
Check maven.scijava.org to see if the package has been correctly uploaded.
¶ For QuPath: partial automation via GitHub actions
Contrary to the Fiji ecosystem, QuPath uses gradle for its dependency management.
This means that scijava-scripts will not work because what takes the role of the bill of materials pom.xml file is not there. Instead, a file called build.gradle is present, and it can contain both some data but also some executable code.
In order to make a new extension for QuPath, what we recommend is:
- to duplicate one of the existing extension (the cellpose extension for instance),
- remove the git history
.gitfolder - edit the
build.gradlefile and start to write the extension with java code - initialise git, push the repo on github
You can then use the github actions workflow to execute a release on scijava maven. Two workflows are available, one to put a SNAPSHOT version, one to put a release version.
In practice, when you develop, you should always have a version with a -SNAPSHOT suffix. For instance 1.5.3-SNAPSHOT. If you need to make the repository available to other repositories, execute the release github action workflow.
When you want to make a release:
- modify the version to
1.5.3in a commit - push the repo on github
- execute the publish release github action workflow
- immediately after, change the version to
1.5.4-SNAPSHOTand push the repo on github
¶ Python repositories - Publishing on PyPI
The BIOP is much less experienced with python packages. Johannes Soltwedel nicely introduced me (Nicolas) to some basics of Python project 'shaping' and PyPI publishing. Is a python a_thing repo is published on PyPI, it can be installed via pip install a_thing.
PyPI is not ideal regarding the solving of dependency issues, but it's also easier than to publish on a conda channel.
There's no BIOP python package published yet, but the goal is to publish abba_python on PyPI. So while I'm struggling with this process, I'm writing it in here.
Assumption:
- Windows OS
- git is installed
Pre-requisite:
- Install miniconda
- Setup a PyPI account (we should do one for the biop maybe?)
¶ Step 1 - To do once on the OS: create a conda environment for cookiecutter
From your base environment, do:
conda create -n cookieconda activate cookiepip install cookiecutter
Cookie cutter can generate the skeleton of a project that will be "easily" publishable on PyPI. For that, it takes a template from github (we could create a BIOP template, but so far I used the one from the documentation).
¶ Step 2 - Start your project from a template and cookiecutter
Execute cookiecutter:
cookiecutter
You will be prompted to enter some information from your future repository (name, license, email, etc.). And at the end, a new folder will be generated that will be used for development. It's the created folder that you need to open in PyCharm for instance.
If you already wrote some code, the best is to create a new folder with cookie cutter, and then copy and paste your code into the newly shaped folder.
.
¶ Step 3 - Write your code
Do not forget the __init__.py files, crucial to define what's in the future PyPI repository.
You should now be, I think, not in the cookie environment, but in the dev environment, the one that can run your project/repository. But I'm not sure.
¶ Step 4 - Do a test build
When placed in your projectory directory, execute pip install -e .: that's an experimental local installation of the repo. A new .egg-info folder shows up in your code folder. When it's successful, you are ready for the next step.
¶ Step 5 - Make the tarball
You need to pip install build. Then execute python -m build. This should create a build folder in your repository, contains a tar.gz file. You can unpack, looks what's inside and make sure that nothing is missing.
¶ Step 6 - Publish on PyPI
pip install twine(once, I did it on the cookie env)twine check dist/*twine upload dist/*
Then check on PyPI, something should have shown up or be updated.
¶ Step 7 - Bumping versions
After a round of commits, you may want to release a new version. If the settings are correct in setup.cfg, you may need to pip install bumpversion and then simply run bumpversion patch or bumpversion minor or bumpversion major depending on the kind of version update you want to do.
¶ Troubleshooting
Good luck! Usually, you may have folder path issues that should be resovable via googling or chatgpting and editing the setup.cfg file.
¶ Adding JavaDoc to your Maven Project (POM)
¶ Your pom.xml
In your projec pom.xml add this to the end (before </project>)
<build>
    <plugins>
        <plugin>
            <groupId>org.apache.maven.plugins</groupId>
            <artifactId>maven-javadoc-plugin</artifactId>
            <version>3.5.0</version>
            <configuration>
      	<outputDirectory>${project.basedir}</outputDirectory>
                <reportOutputDirectory>${project.basedir}</reportOutputDirectory>
                <destDir>docs</destDir>
            </configuration>
        </plugin>
    </plugins>
</build>
You will now have a javadoc engtry under your Maven Plugins section.
Run
javadoc:javadoc. Unless you have errors in your JacaDocs comments, it should create thedocsfolder, which you can then commit to yourmainbranch
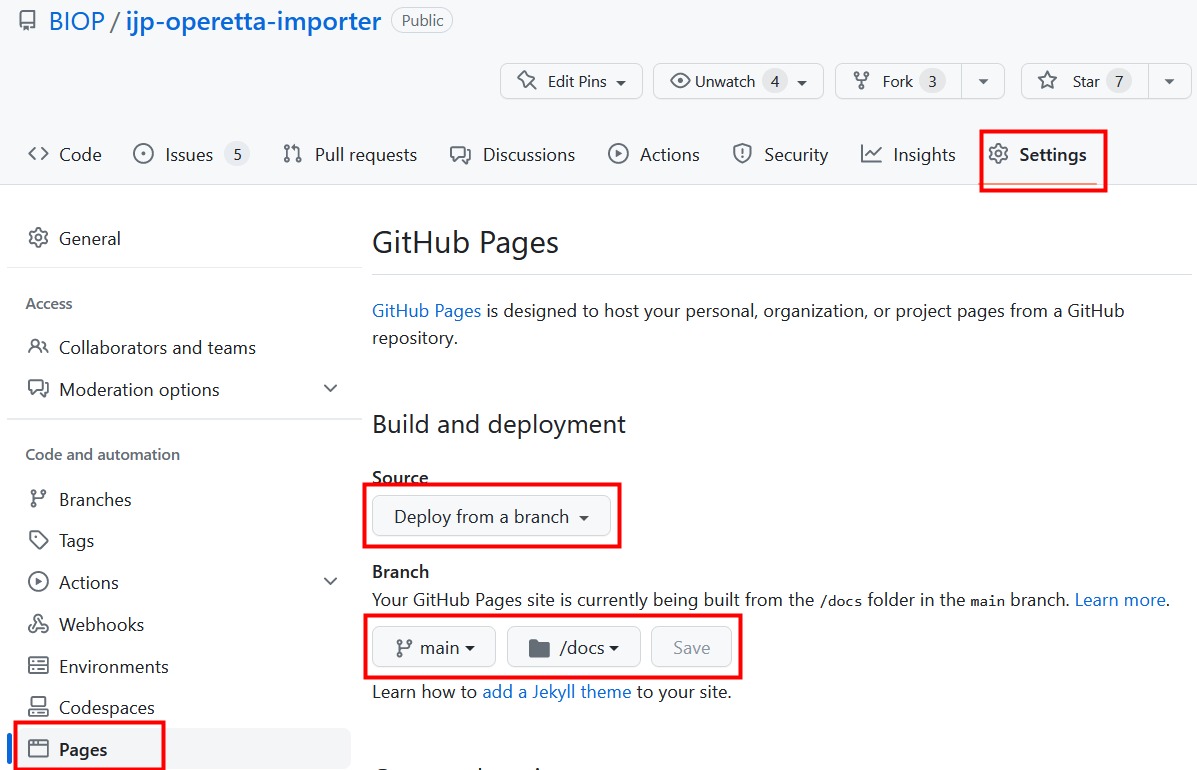
¶ Your GitHub project
Configure your GitHub Pages
- Go to
Settings - Click on
Pageson the left menu - Source:
Deploy from a branch - Choose your main branch
- Choose the folder
/docs