¶ File formats supported by OMERO
Every file formats that is readable by BioFormats can be imported in OMERO.
BioFormats curates the list of supported formats
¶ Importing images to OMERO
WARNING: If your image is NOT pyramidal and has a size that exceeds 3000 x 3000 pixels, then you have to convert it in a pyramidal ome-tiff file before uploading it on OMERO. You can download, install and use the NGFF-converter software and/or contact the EPFL OMERO team to get some support.
Tip: We suggest you to tokenize images name with underscores and to NOT use any comas ",". It will make your life easier when annotating.
Tip: If you select a folder with multiple sub-folders, images from all the sub-folders will be grouped into a unique dataset.
The original path is kept in OMERO.
To find it, click on an image. On the right hand side, click on theShow file paths on serverbutton

¶ For yourself
- Launch the OMERO.insight client
- Enter your credentials

- Go to
File > Import
or Click on theImport iconin the toolbar;
or Select a destination Project or Dataset for the imported data, right click and selectImport.

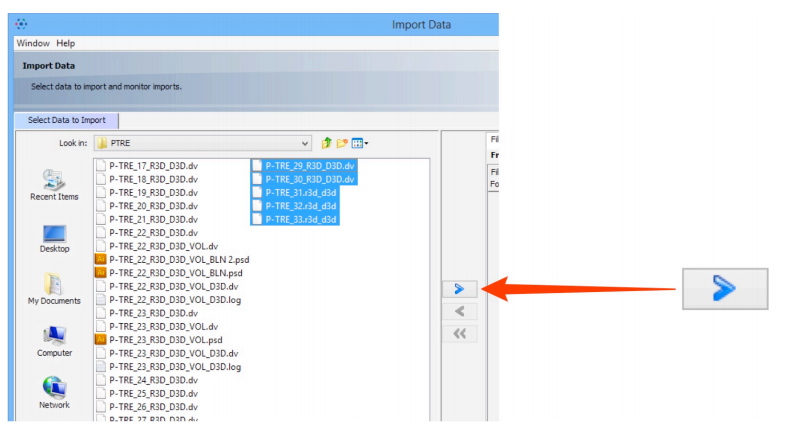
- Use the File Chooser to locate your data
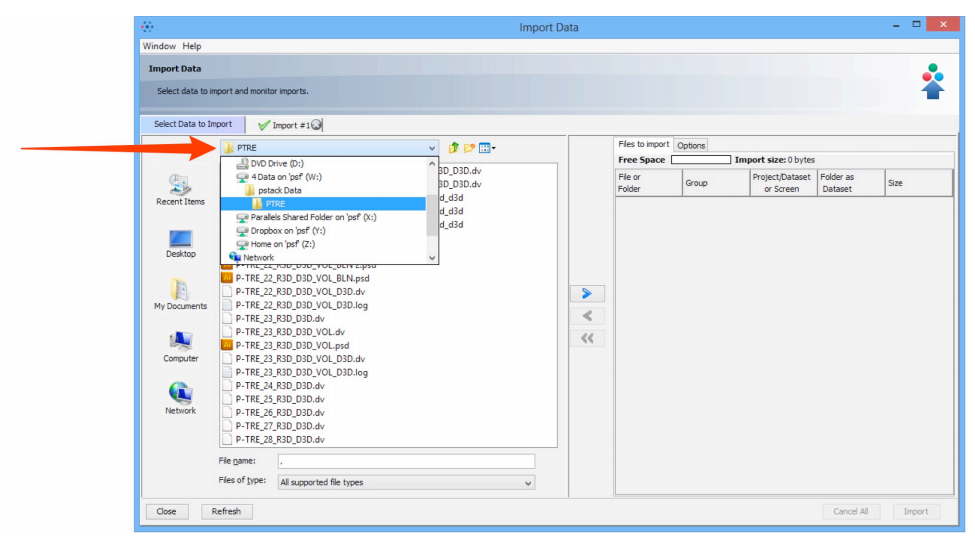
- Select image data to be imported.
- Click on the Add arrow.
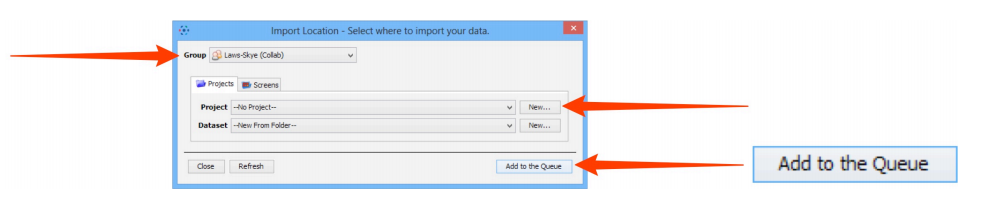
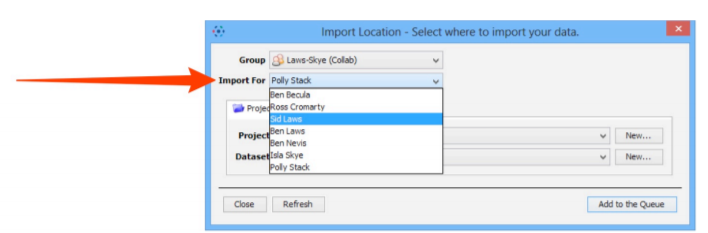
- Specify a location for saving imported data:
a. Select a group if you are a member of more than one
b. SelectProjectsin the tab
c. A newprojectand/ordatasetcan be created or selected from the drop-down menus
A newdatasetcan also be automatically created from the source folder name
e. ClickAdd to the Queue
Be Careful : special case for VSI files => see the corresponding section below
-
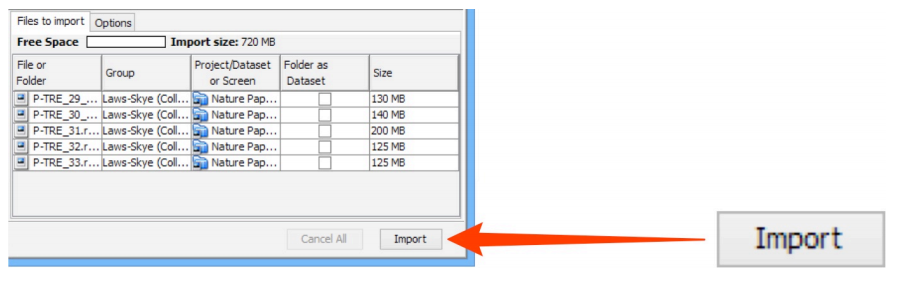
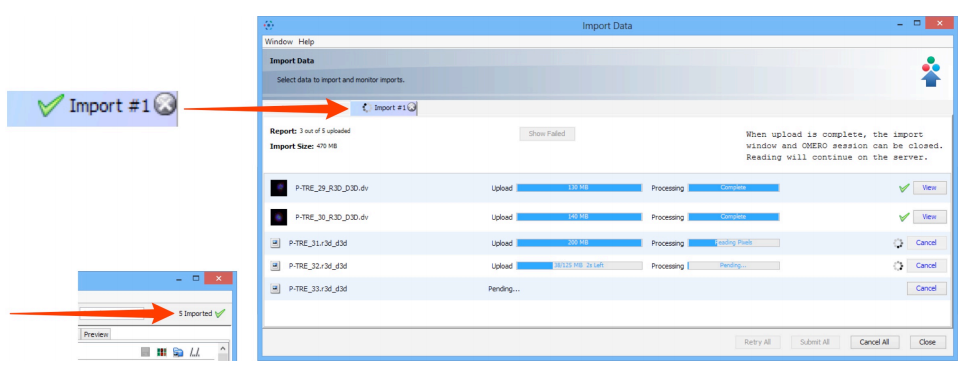
Data to be imported appears in the queue pane. When ready click on
Import.
-
Import progress will be shown in the
Import #1tab.- Further data can be queued and imported using the
Select Data to Importtab. - Multiple queues can be run simultaneously.
- A green check is shown in the import tab and in the top right corner of the main Data Manager window when the queue is successfully imported.
- Further data can be queued and imported using the
-
Once the import is done,
refreshOMERO.insight to see the imported images.
Good to know : the processing part is generally more time consuming than the upload part.
IMPORTANT NOTICE : Do NOT CLOSE the window neither OMERO.insight if the upload is not finished yet ! We strongly recommand to not close the window neither OMERO.insight if the processing is not done yet but if your microscope session ends soon, you can close OMERO.insight Doing that way, you will not be able to know if your upload has succeed or not since your images will be able available only after the full processing part.
IMPORTANT NOTICE : It is possible to upload an image with the exact same name as another image in the current dataset. OMERO differentiates images by their ID, not by their name.
¶ Import for another user
If you are an OMERO Group Owner , you can use the Import For drop-down box to select another user to import the data as. The chosen user will be the owner of this data.
The Project and Dataset drop-down boxes list the projects and datasets available for the selected user to import into.
¶ Special case for VSI files
VSI files always come with two parts, which MUSTN'T be separated (i.e always live under the same folder)
image.vsifile_image_folder
image.vsishould NOT be included inside _image_ (i.e. always keep one next to the other).
If you try to move .vsi files in a different folder or to rename it, do not forget to move / rename its corresponding folder.
To import .vsi files on OMERO, you need :
- to select ONLY
image.vsi; NEVER select_image_folder - to manually select an existing dataset or create a new one (The option
New from folderon OMERO.insight cannot be used for .vsi files)
¶ Batch import
If you have a specific naming convention or if you would like to customize the script for your project, please contact the EPFL OMERO team and we'll help you by adapting the script to fit your needs
We've created a script, available on GitHub which imports all images within a folder (including images in sub-folders) into a single dataset on OMERO.
This script also allows you to add tags on your images directly during the import.
- Open the script in Fiji and run it
- Enter your Gaspar credentials
- Select the folder you would like to import.
This folder should contain your images, or be in sub-folders.
All images will be imported to the same dataset on OMERO - Choose the dataset on OMERO
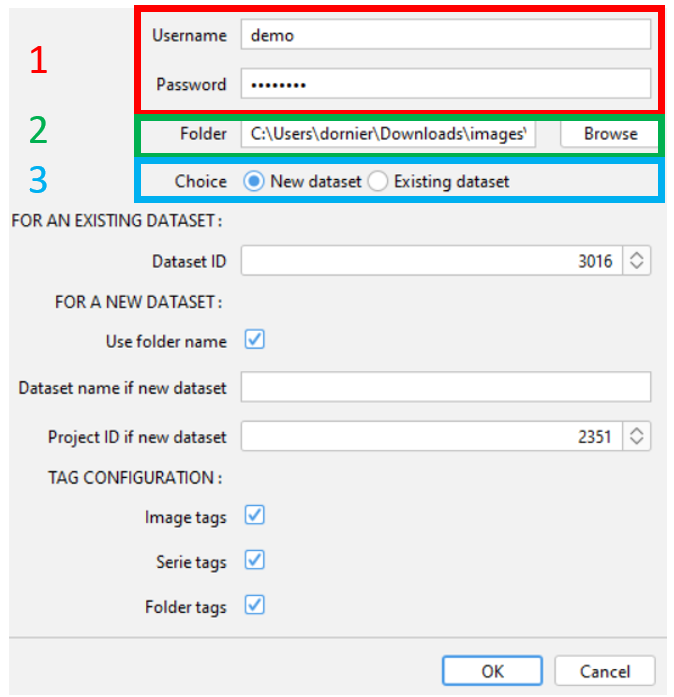
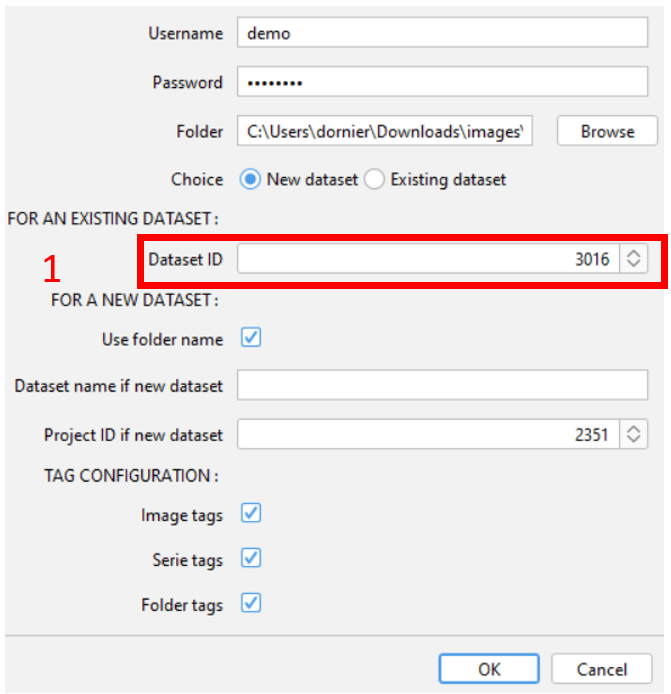
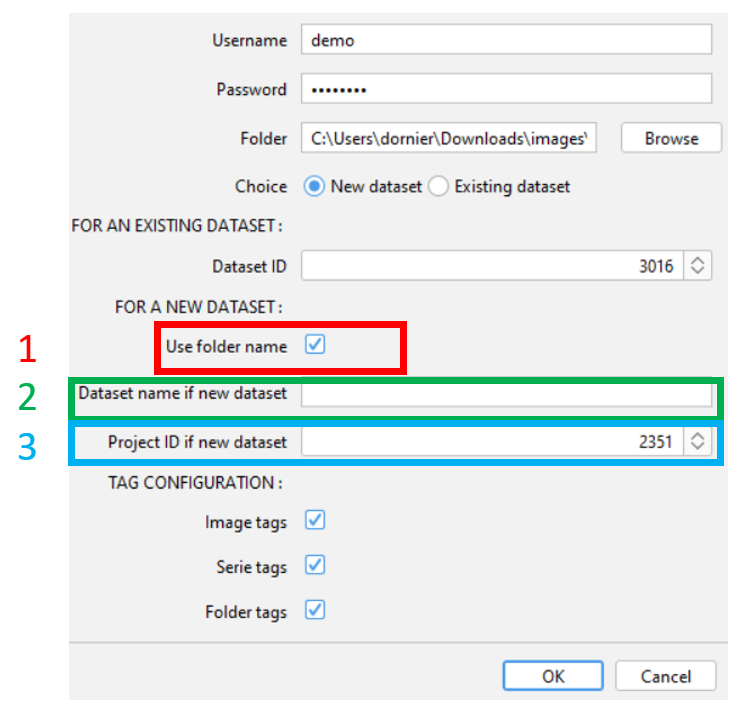
¶ For an existing dataset
- Indicate the ID of the existing dataset on OMERO. All images will be imported inside
¶ For a new dataset
- Check the box if you would like to use the folder name for the name of the new dataset. In that case, you can skip the next point.
- Enter the name of the new dataset if you have not check the box above
- Enter the ID of the project where the dataset will be created.
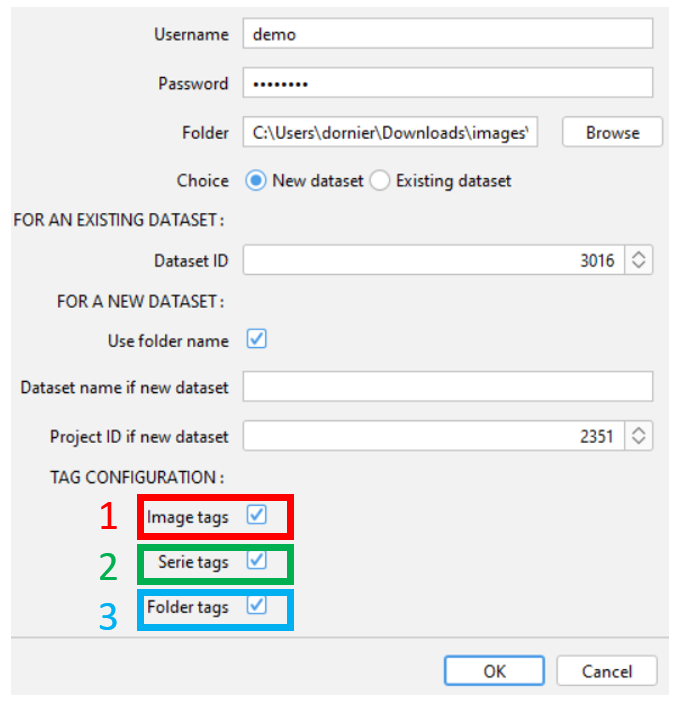
¶ Tag configuration
The script can automatically tag your images. Different tags can be applied.
- Image tags : the name of the image (without the name of the serie for fileset images) is parsed. The unique separator used for parsing is the underscore
_. Exemple : if your name is formatted likeaa_bb-cc_dd ee_ff.tif, then, the script add the following tags :aa,bb-cc,dd ee,ff. - Serie tags : The name of the serie is parsed using underscore
_as separator. You can activate this option espacially for .vsi, .lif files, but also file format are compatible. - Folder tags : The folder and sub-folder(s) name are added as individual tag. There is no parsing of the name.
¶ Running the script
- If you have uncompatible files (ex. non-image files or unrecognized file formats), a warning pops up asking you to skip or continue the script. If you click on
Yes, the script will ignore these files.
To know which files are problematic, click onNoand scroll the logs until you see the following lines.


If among the uncompatible files, you have some images with a non-standard format (i.e. considered as uncompatible by the script), contact us at omero@groupes.epfl.ch
- If you have some
.ome.tifffiles, another warning message appears. You should put all and only.ome.tifffiles which are part of the same fileset in the one folder. For example, if you have 15.ome.tiff; 5 files per fileset, then you should have 3 folders with the 5 files inside each folder.- If you have the correct folder hierarchy, you can click
OK - If you need to move files and create folders, click
Cancel
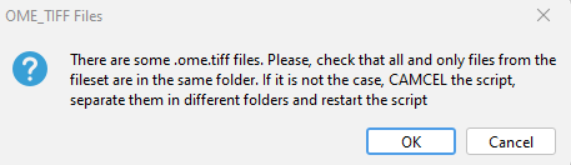
- If you have the correct folder hierarchy, you can click
¶ Add voxel size during import
If a file does not contain voxel sizes in its metadata, they can be added manually during the upload to OMERO. This can be done under the Options tag from the right panel of the OMERO.insight client.

¶ More documentation on this topic...
To learn more about importing images to OMERO, we recommend you to visit the dedicated page from the official OMERO guide
or this nice step-by-step PDF tutorial
¶ Import Screens
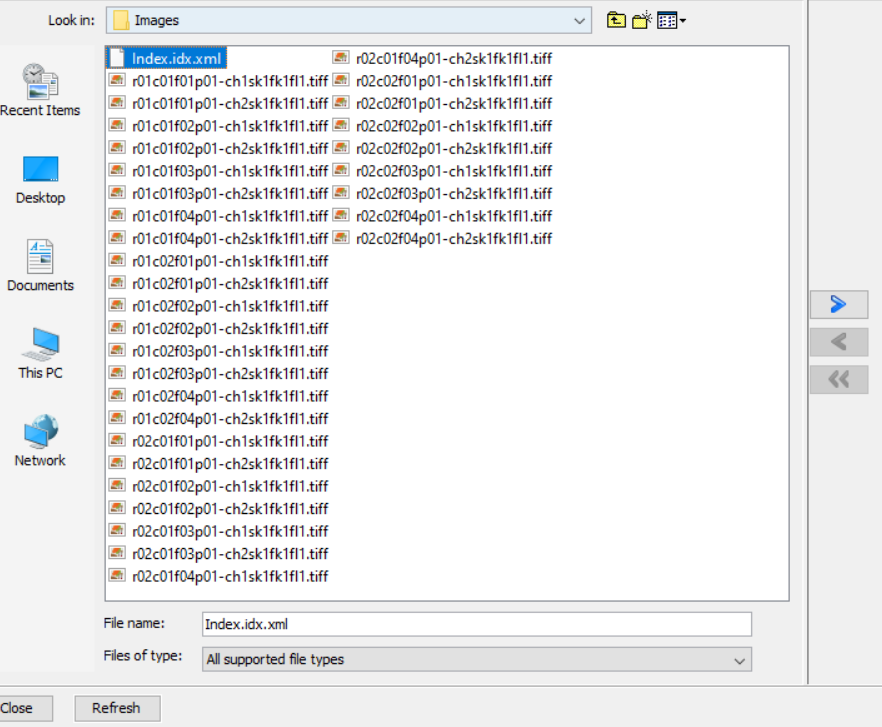
¶ PerkinElmer Operetta [.xml, .tiff]
Please check that the .xml and .tiff files are in the same folder, and that this folder does not contain any other file or folder.
- Select ONLY the .xml file (the individual tiffs will also be imported, as the .xml points to them).
If you used flat-field correction script to generate your images, please rename the .xml file as Index.idx.xml.
- Click on the right arrow
- In the Importer window, go to the
Screenstab instead ofProjects. - Select an existing Screen or create a new one
- Hit
Add to the queue
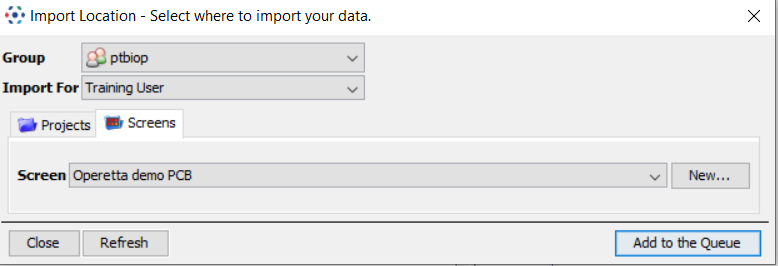
- Click on
Import
IMPORTANT NOTICE : Do NOT CLOSE the window neither OMERO.insight if the upload is not finished yet ! We strongly recommand to not close the window neither OMERO.insight if the processing is not done yet but if your microscope session ends soon, you can close OMERO.insight Doing that way, you will not be able to know if your upload has succeed or not since your images will be able available only after the full processing part.
EVEN MORE IMPORTANT NOTICE : Do not RENAME a plate, screen, run, well neither image during the processing part of the importation. Wait until the green tick appears on the importation window before renaming any object
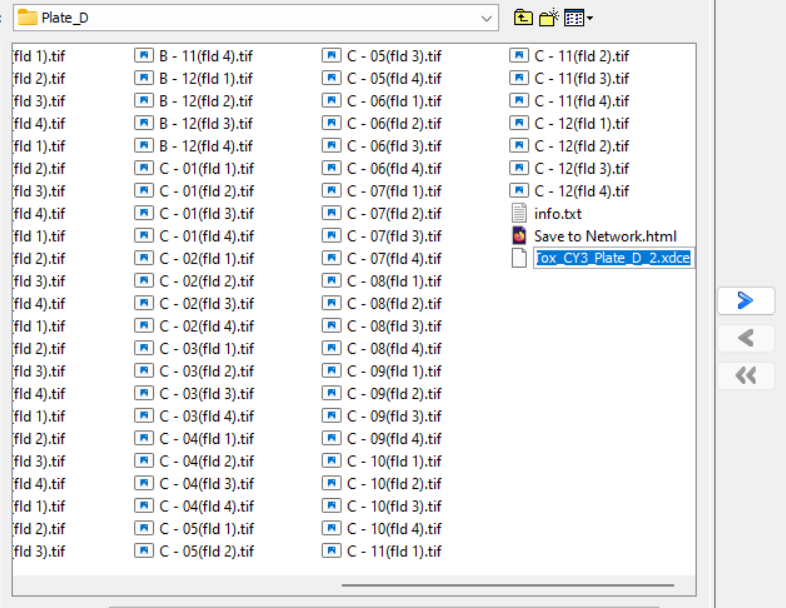
¶ InCell 1000/2000 [.xdce, .tif]
Please check that the .xdce and .tiff files are in the same folder and that all the tiff files are present. If some images are missing (ex: only 2 channels instead of 3), then the import will fail.
Do not try to import a subset of your experiment (Ex: only 3 wells out of 12). Even if OMERO only uploads your subset, it will create black images of the same XYCZT sizes for all missing wells/positions. The amount of data will, at the end, by the same.
-
Select the
.xdcefile
Example:
-
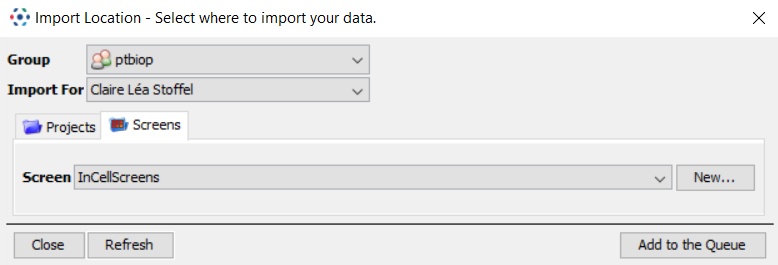
In the Importer window, go to the
Screenstab -
Select an existing Screen or create a new one.
-
Hit
Add to the queue -
Click on
Import
IMPORTANT NOTICE : Do NOT CLOSE the window neither OMERO.insight if the upload is not finished yet ! We strongly recommand to not close the window neither OMERO.insight if the processing is not done yet but if your microscope session ends soon, you can close OMERO.insight Doing that way, you will not be able to know if your upload has succeed or not since your images will be able available only after the full processing part.
EVEN MORE IMPORTANT NOTICE : Do not RENAME a plate, screen, run, well neither image during the processing part of the importation. Wait until the green tick appears on the importation window before renaming any object