Warning: The OMERO-RAW extension (i.e. qupath-extension-biop-omero) is now DEPRECATED and NOT SUPPORTED ANYMORE on QuPath 0.6.x. It has been replaced by the official qupath-extension-omero
In order to transfer your QuPath projects to be compatible with the new extension, please have a look to Migration from QuPath 0.5.x to QuPath 0.6.x
The qupath-extension-biop-omero will not be developed further, except to fix major bugs on QuPath 0.5.x (support for that will be done until the next major release of QuPath (i.e. 0.7.x)).
¶ On QuPath 0.6.x
¶ Installation
¶ Quick install (EPFL users only)
- Copy locally the folder
\\sv-nas1.rcp.epfl.ch\ptbiop-raw\public\0-Software\QuPath\QuPath_Common_Data_0.6 - Replace your folder
C:\QuPath_Common_Data_0.6by the copied folder. - Re-start QuPath
Already installed on BIOP computers
¶ Manual install
Prerequisites
- You should already have configured your QuPath with the path to the extension folder.
- If it is not the case, please go on
Edit > Preferences. - Then, under the
Extensionmenu, open the file browser and create an empty folderQuPath_Common_Data_0.6in yourC:drive (orApplicationfolder on Mac) - Restart QuPath
Install
- Please refer to the extension manager documentation to know how to install / update the QuPath OMERO extension. You might need to restart QuPath.
In order to be compatible with the former qupath-extension-biop-omero, you also need to install optional dependencies when it is asked and to choose the latest version of the extension.
¶ Migration from QuPath 0.5.x to QuPath 0.6.x
In order to transfer your OMERO-QuPath projects to be compatible with the new extension, please install the qupath-extension-biop from our QuPath-BIOP catalog. Once installed and QuPath restarted, you can find the migration script under
Extensions -> BIOP -> Scripts -> OMERO -> Update project to official omero extension. Follow the step-by-step instructions written at the beginning of the script.
¶ Usage
Please refer to the official documentation to know how to use the OMERO-QuPath extension
¶ Scripts
¶ Sample scripts
Templates scripts to send / import ROIs, KVPs and channel settings are available under Extensions -> OMERO -> Sample scripts
¶ On QuPath 0.5.x
OMERO-RAW extension for QuPath allows to directly access to the raw pixels of images. All types of images (RGB, fluorescence, ...) are supported with this extension.
Github repo : https://github.com/BIOP/qupath-extension-biop-omero
¶ Installation
Prerequisites
- You should already have configured your QuPath with the path to the extension folder.
- If it is not the case, please go on
Edit > Preferences. - Then, under the
Extensionmenu, double-click on the text area - Browse to the
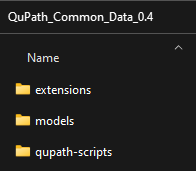
QuPath_Common_Data_0.5folder (generally, it isC:\QuPath_Common_Data_0.5withextensions,modelsandqupath-scriptsfolder inside)
- Close QuPath
Downloads
- Download the latest version of
qupath-extension-biop-omero-x.x.x.zipand Unzip it. - Download the OMERO-java dependencies ; unzip the
libsfolder insideOMERO Java - Copy the
libsfolder and the two unzipped .jar files toC:\QuPath_Common_Data_0.5\extensions.
If there are previous version(s) of
qupath-extension-biop-omero-x.x.x.jarorsimple-omero-client-x.x.x.jarin the folder, delete them and keep only the latest one.
Update
- Restart QuPath
¶ Pre-install QuPath for container deployment
Downloads
- Download the latest version of
qupath-extension-biop-omero-x.x.x.zipand Unzip it. - Download the OMERO-java dependencies ; unzip the
libsfolder insideOMERO Java
Installation
- Copy
qupath-extension-biop-omero-x.x.x.jar,simple-omero-client-x.x.x.jarandlibsfolder inQuPath-x.x.x/app - Add the following entries in the files
QuPath-x.x.x.cfgandQuPath-x.x.x (console).cfg(underQuPath-x.x.x/appfolder)
app.classpath=$APPDIR/qupath-extension-biop-omero-x.x.x.jar
app.classpath=$APPDIR/simple-omero-client-x.x.x.jar
app.classpath=$APPDIR/libs/*
¶ Connect to OMERO
Prerequisites
- Open a QuPath project.
Step by step
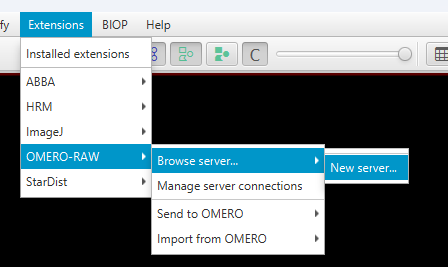
Create a new OMERO server via the command Extensions → OMERO RAW → Browse server… → New server.
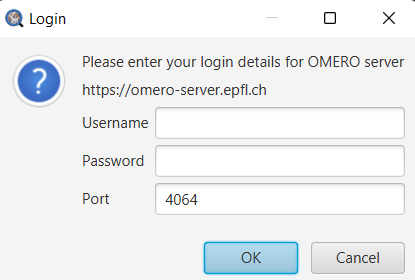
- On the popup window, enter the omero-server adress
https://omero-server.epfl.ch

- Enter your gaspar credentials
- Enter the open port of your OMERO server (by default, it is
4064for EPFL).
¶ Import an image from OMERO
Prerequisites
- Connect to OMERO (see above section)
Step by step
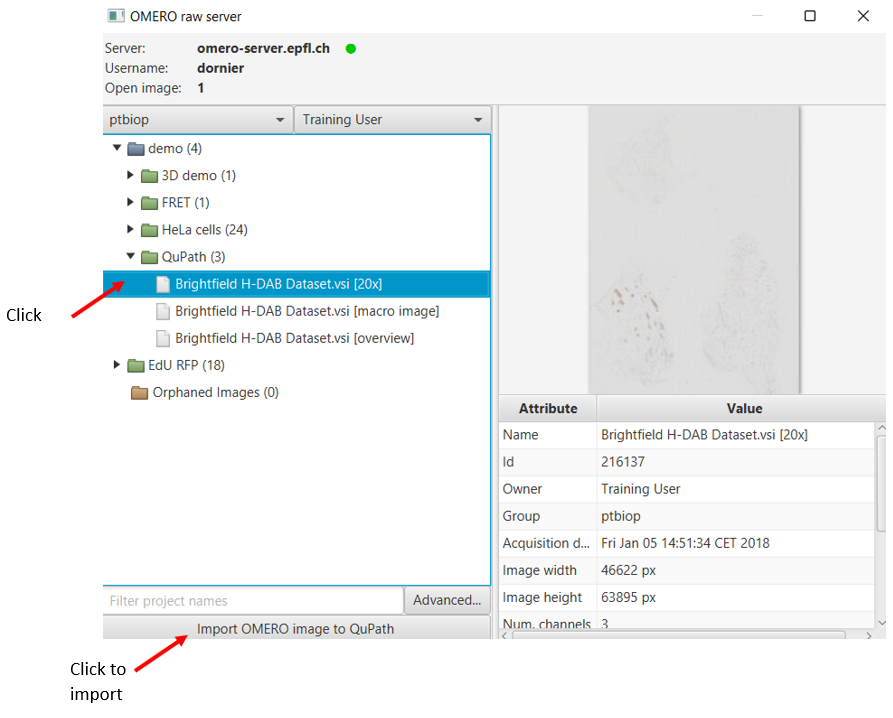
- When the connection is established, a browser appears with your projects and datasets
- You can choose your group and the user you want to browse data from. By default, the browser shows you in your default group.
- Expand the projects and datasets to find images you want to analyze.
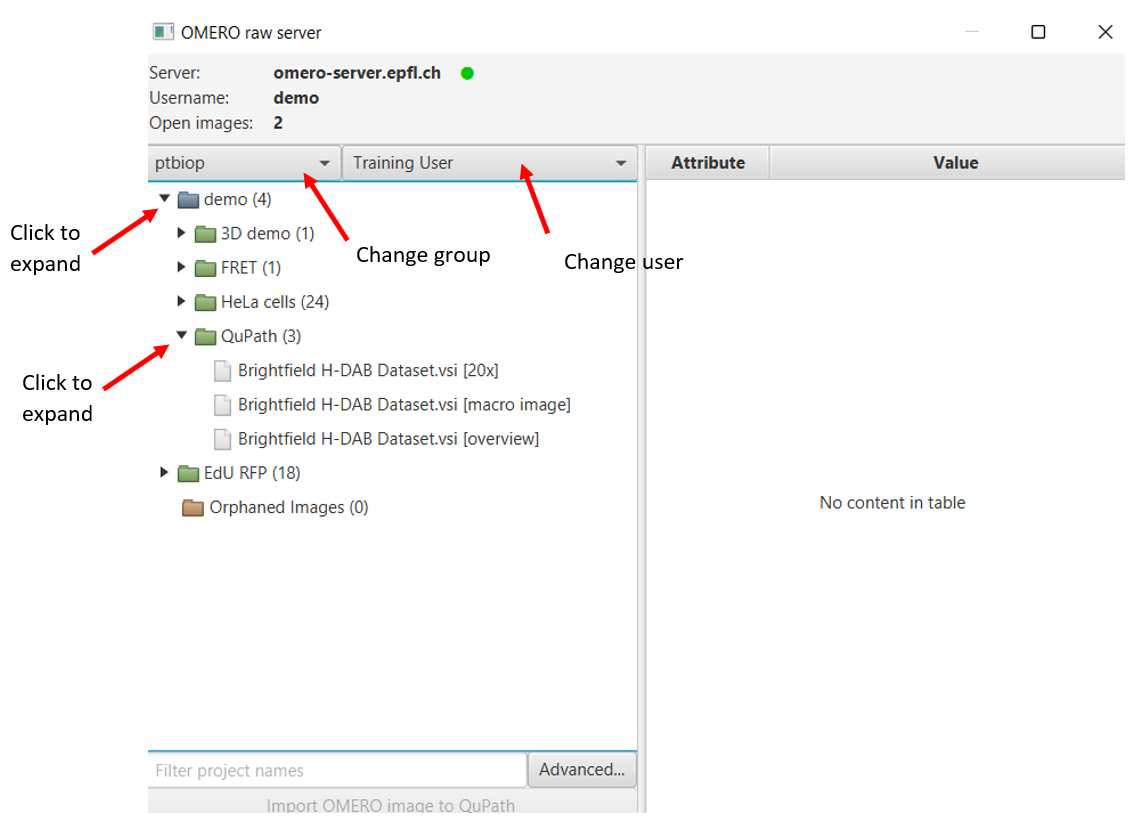
- Select one or more images. You can find image details on the right panel.
It is also possible to select an entire dataset or project to import. Images will be imported individually, without any hierarchy.
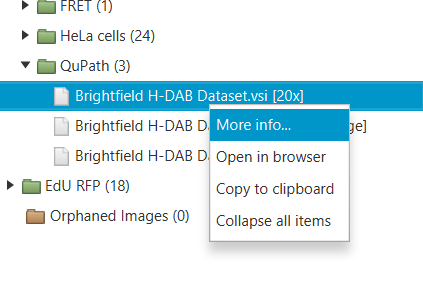
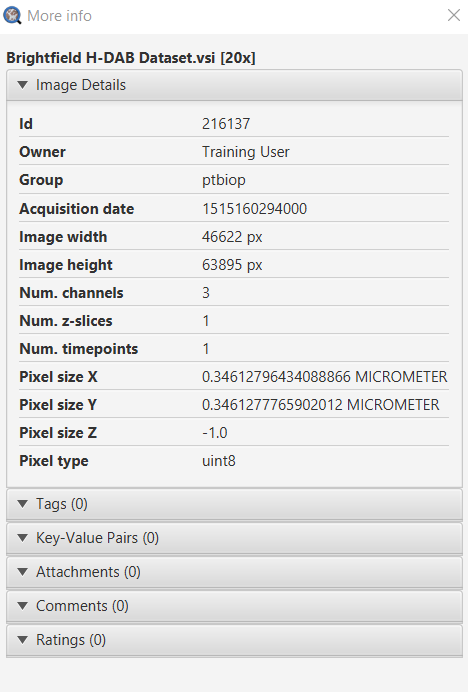
- If you need to access tags or key-value pairs of the image, right-click on the image and select
More info... - If you want to open the image in the webclient, right-click on the image and select
Open in browser
- Click on
Import OMERO images to QuPath - On the pop-up window, select the type of image in "Set Image type"
- If you want to import ROIs that are attached to the image, tick the box
Import objects.
If ROIs have a comment formatted as mentionned in the "Send annotations to OMERO" section, QuPath will resolve the hierarchy between ROIs.
- Click on
Import
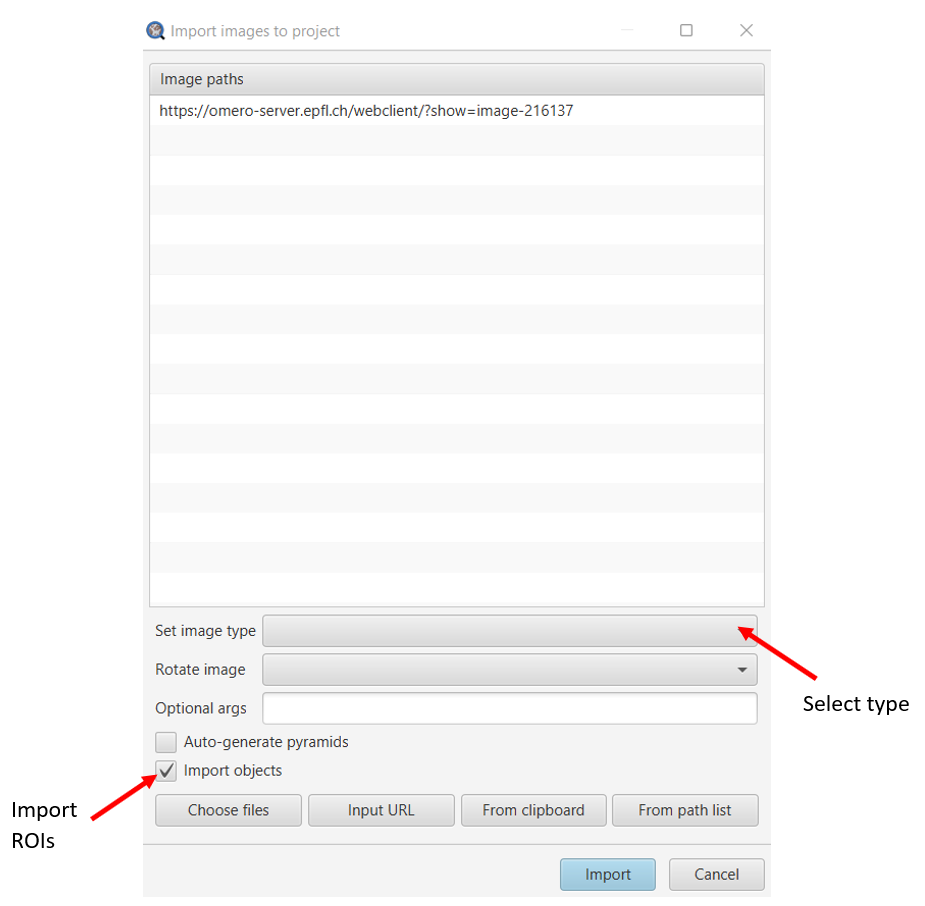
- Images is now linked to your QuPath project.
If you did not have a QuPath project open, the import popup window will not appear. The image will be loaded and a small window popups up to choose the image type.
¶ Manage server connections
You can have a look at all active or inactive server used in the current session. You can log-in, log-out or remove every current servers.
- Go in
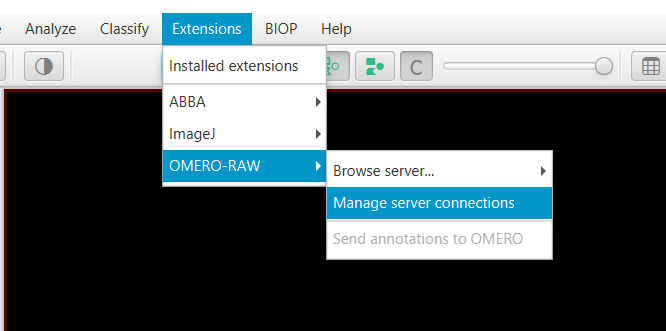
Extensions → OMERO RAW → Manage server connections - Clcik on
Log in,Log outorremovedepending on what you want to do.


¶ Send to OMERO
¶ Annotations & measurement tables
The following procedure decribes how to save your annotations as ROIs in OMERO, as well as annotations and detections table. An option can be checked to delete existing ROIs/tables in OMERO in order to keep your project up-to-date and to not mix with previous annotations.
On QuPath
- Open an image with annotations
- Go in
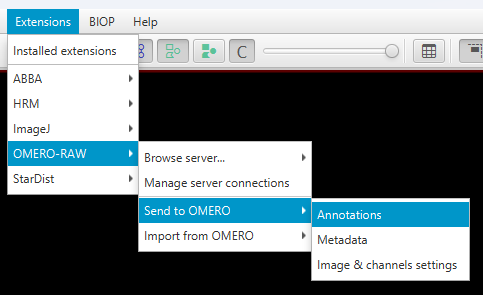
Extensions → OMERO RAW → Send to OMERO → Annotations
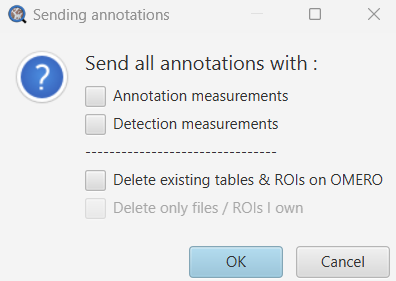
On the popup window, select import options
- Annotation measurements : send to OMERO annotations' measurement table
- Detection measurements : send to OMERO detections' measurement table
- Delete existing tables & ROIs on OMERO : delete previous ROIs on OMERO after uploading the new ones and delete previous file versions (csv and omero.table) linked to the current QuPath project.
- Delete only files / ROIs I own : This option can be used when more than one person are working on the same image. If you check, it will not delete others'work, even if you have rights to do so.
- Click on
OK - On the popup window, click on
OK

All annotations are automatically sent to OMERO without the need to select them.
Back to the webclient
- Annotations are imported as ROIs. For each ROI, a comment is added that contains the type of PathObject, the assigned class and the hierarchy position. It is formatted as
Type:Class1&Class2:ObjetID:ParentID:ObjectName.
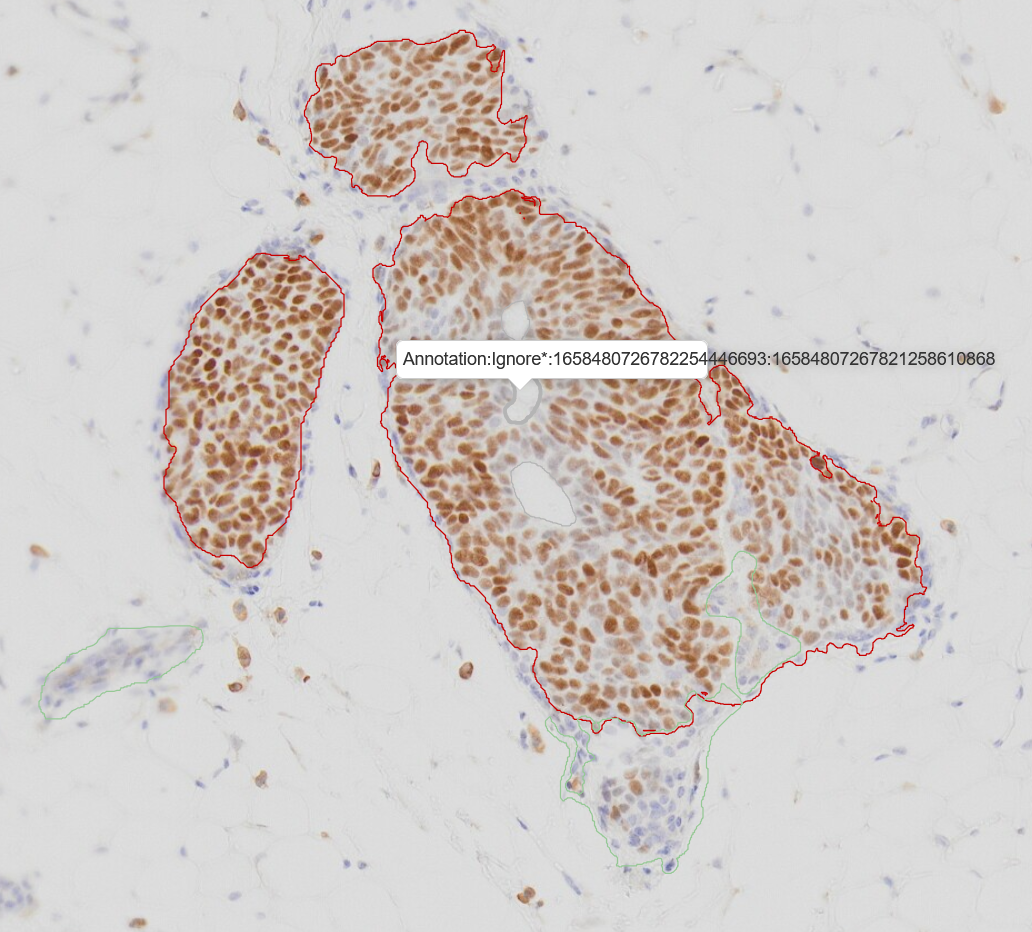
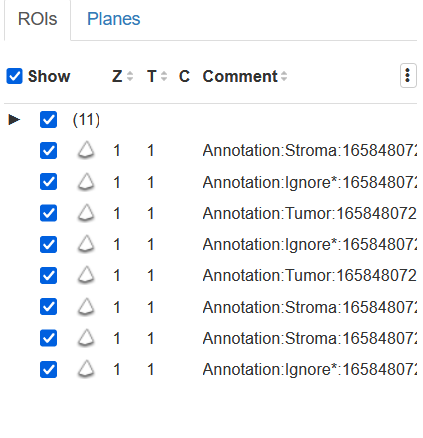
Do not change the format of this comment. If it changes, or if there is no comment, QuPath will not be able to recognize what kind of object/class it is neither to resolve the hierarchy. It will automatically assign the ROI as an annotation object, without any class, at the root hierarchy.
On OMERO, it is only possible to visualize 500 ROIs at the same time. A slider with the number of pages allows you to navigate between all ROIs.
- Annotation and/or detection tables are attached to the image as an OMERO.table and a csv file. The is formatted as
QP Type table_qpprojName_Date.
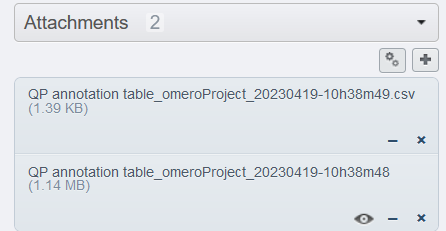
The lock status of QuPath annotations is also sent to OMERO, even if it is not visible in the webclient.
¶ Metadata
You can save your QuPath metadata fields on OMERO. If the key and the value are identical, then it is sent as an OMERO tag. If they are different, then it is sent as an OMERO key-value pair.
On QuPath
- Go in
Extensions → OMERO RAW → Send to OMERO → Metadata
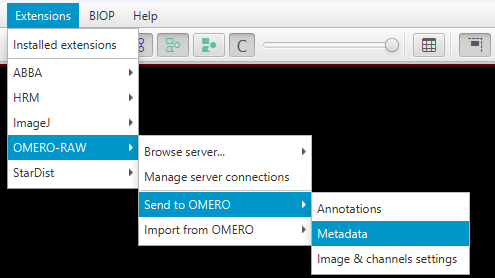
On the popup window, select sending options, for key-values and tags separately
- Only add new : Keep all key-value pairs / tags that are already on OMERO and add new ones. If there are some keys in QuPath that are identical to keys on OMERO, then keys on OMERO will NOT be updated.
- Update and add new : Keep all keys that are already on OMERO, update value for each key that is identical to QuPath key and add new key-value pairs.
- Delete and add new : Delete all key-value pairs that are already on OMERO and add all QuPath key-value pairs.
- Unlink and add new : Unlink all tags that are already on OMERO and add all QuPath tags.
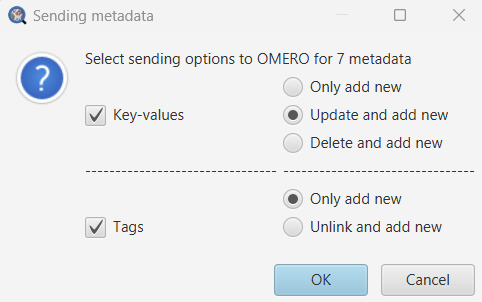
Be careful : On OMERO, there is the possibility to have two identical keys with different values. THIS SCENARIO SHOULD BE AVOIDED AT ANY PRICE. If such a case happens, no key-values will be uploaded on OMERO neither be updated and a popup window informs you to change keys to have all UNIQUE keys
- Click on
OK - On the popup window, click on
OK

Back to the webclient
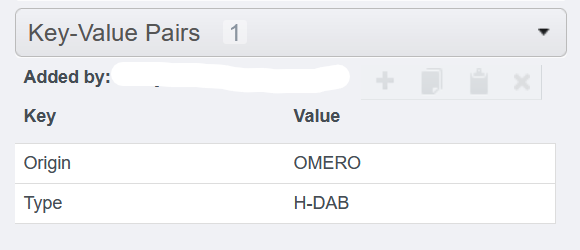
- Metadata are imported as key-values.
¶ Image & channels settings
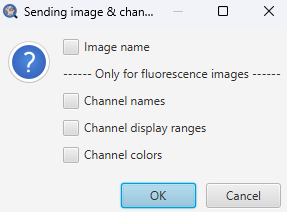
QuPath view settings can be applied to the image on OMERO
- Image name
- Channel name
- Channel color
- Channel display range (min/max displayed)
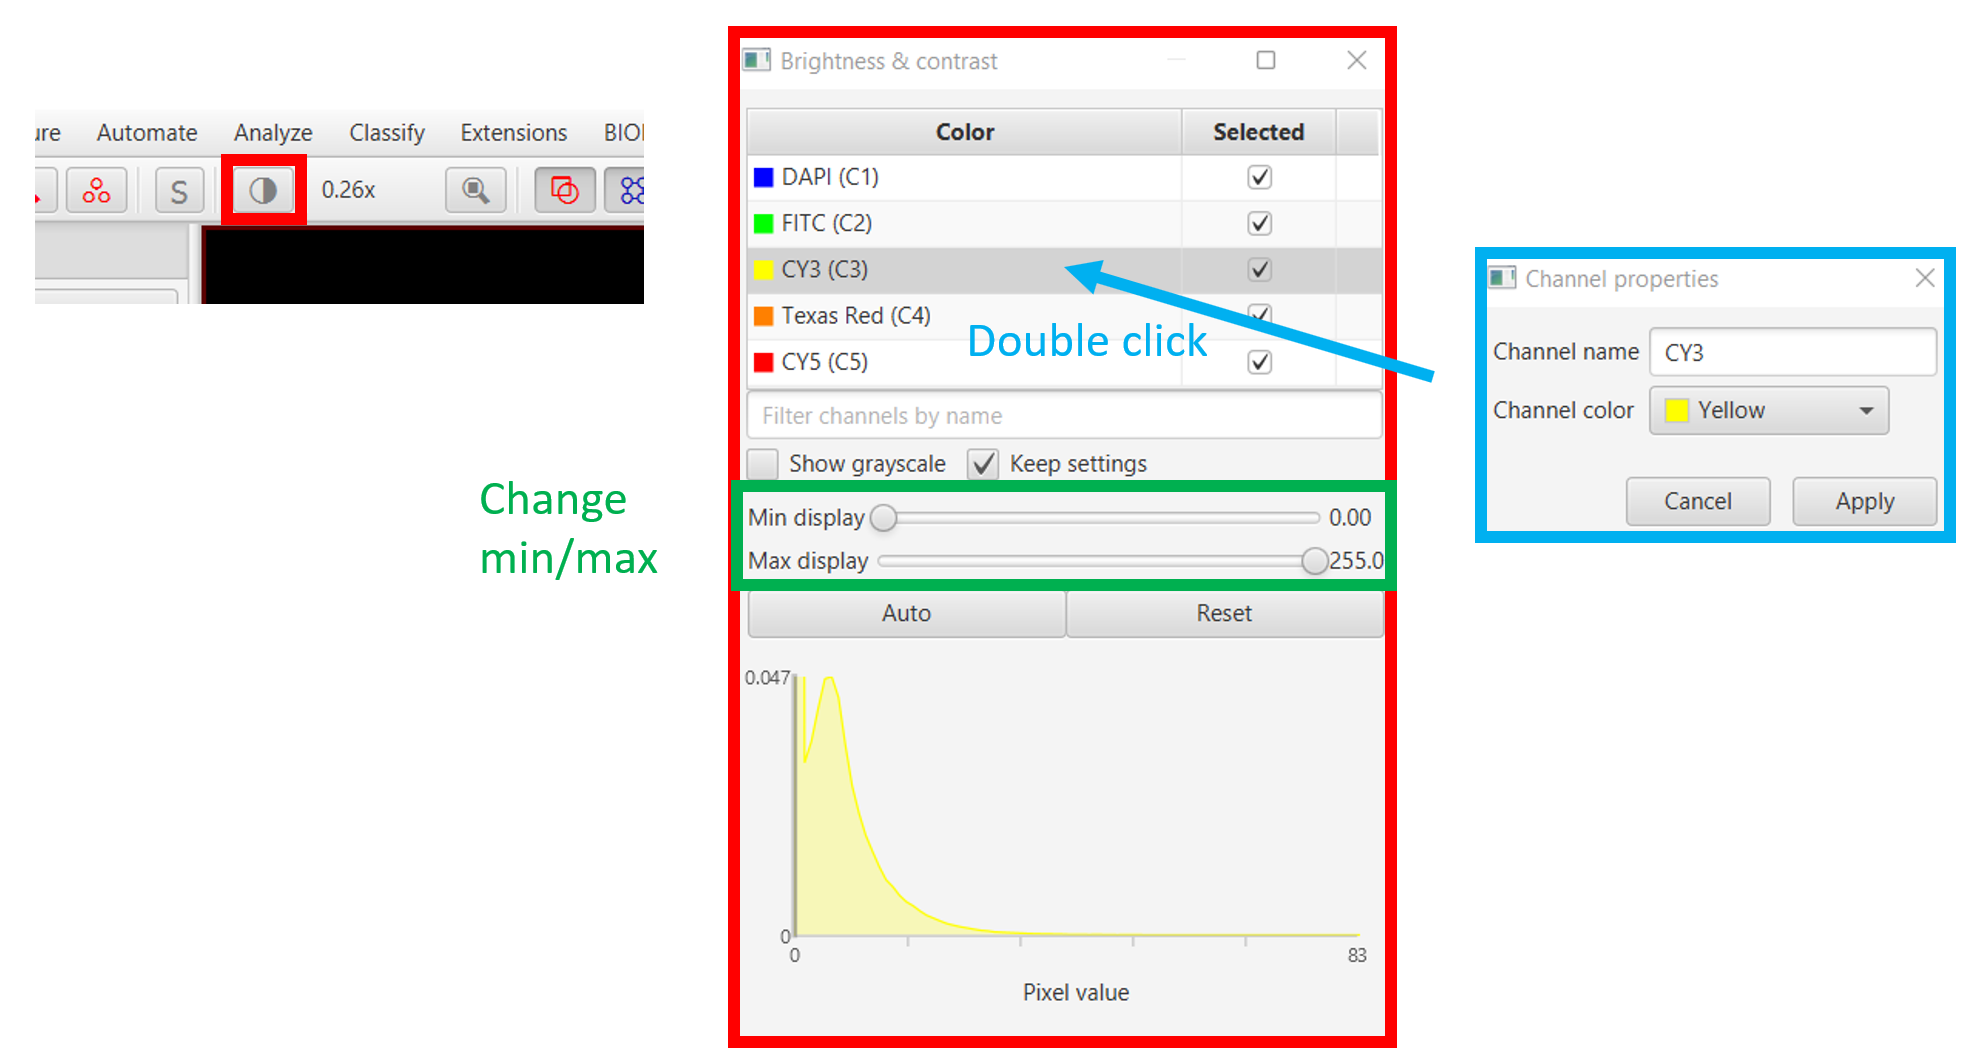
¶ To change view settings on QuPath
- Click on the Brightness and contrast icon.
- Change the min/max values in the main window
- Double-click on a channel row
- On the popup, change the name and the color of the channel
¶ To update OMERO with new view settings
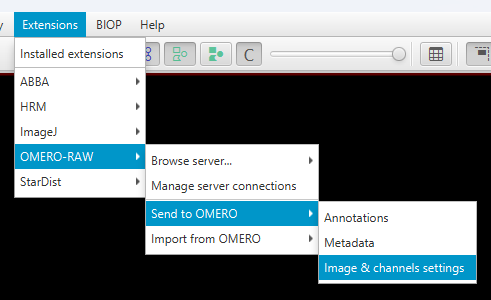
- Go in
Extensions → OMERO RAW → Send to OMERO → Image & channels settings
- On the popup, select which settings you want to update
- Click on
OK
¶ Import from OMERO
¶ ROIs
As mentionned in the previous section, ROIs can be imported to QuPath at the image import.
But there is also the possibilty to add them to the qupath project at any time. Moreover, if you collaborate with different people on the image, you have the possibility to import from OMERO only the ROIs from a certain user in the current group.
- Open an image coming from OMERO
- Go in
Extensions → OMERO RAW → Import from OMERO → Annotations
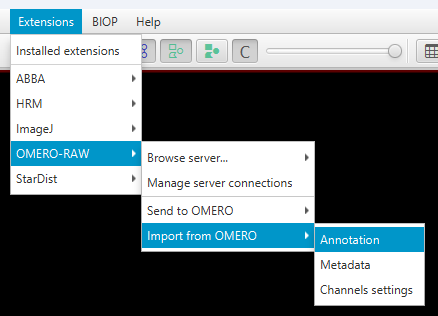
On the popup
- Select a user from who you want to import ROIs in the drop-down menu. If you select
All, then all ROIs are imported - You can choose to replace all current annotations/detections in QuPath by the ROIs imported from OMERO or simply to add them to the project.
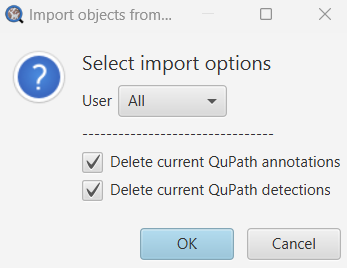
If the ROIs stored in OMERO were previously coming from QuPath, then the class and hierarchy of each of them will be automatically retrieved.
¶ Tags & Key-Value pairs
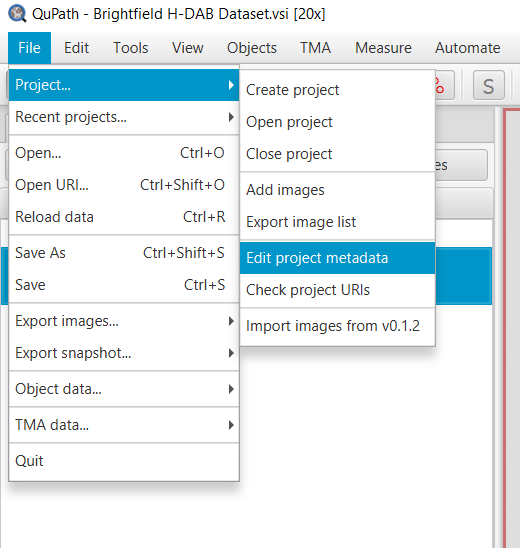
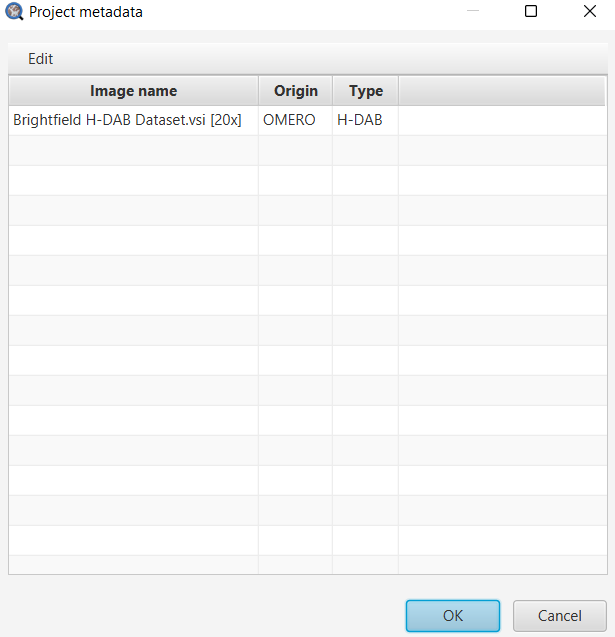
You can import your OMERO tags and key-value pairs to QuPath, in the form of QuPath metadata fields. As the tags are on key-word, the key and the value of the QP metadata field will be identical.
- Go in
Extensions → OMERO RAW → Import from OMERO → Metadata
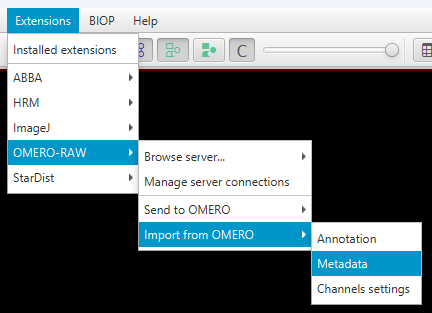
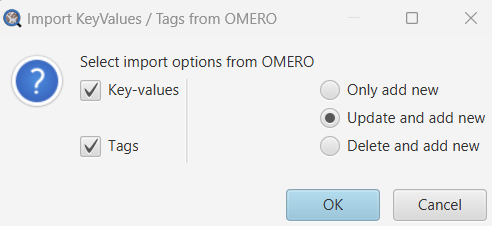
On the popup window, select import options
- Only add new : Keep all metadata that are already in QuPath and add new ones. If there are some keys on OMERO that are identical to keys in QuPath, then keys in QuPath will NOT be updated.
- Update and add new : Keep all keys that are already in QuPath, update value for each key that is identical to OMERO key and add new metadata.
- Delete and add new : Delete all metadata that are already in QuPath and add all OMERO key-value pairs / tags.
Be careful : On OMERO, there is the possibility to have two identical keys with different values. THIS SCENARIO SHOULD BE AVOIDED AT ANY PRICE. If such a case happens, no key-values will be uploaded on OMERO neither be updated and a popup window informs you to change keys to have all UNIQUE keys
Key-values / tags are imported in QuPath as metadata fields.
¶ Channel settings
OMERO channel settings can be loaded on the image in QuPath
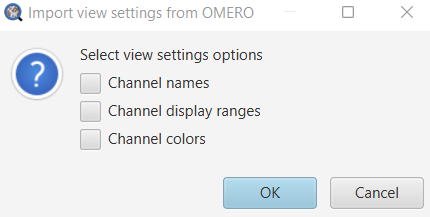
- Channel name
- Channel color
- Channel display range (min/max displayed)
Step by step
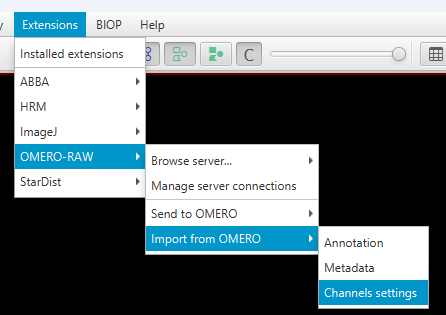
- Go in
Extensions → OMERO RAW → Import from OMERO → Channel settings
- On the popup, select which settings you want to load
- Click on
OK
- QuPath image, as well as its thumbnail, updates according to OMERO settings.
¶ Scripting
- All QuPath-OMERO commands can be used in QuPath scripts (groovy language). Template scripts are available under
Automate → Shared scripts → Extension → OMERO. For extenal users, template scripts are available on our GitHub.
If you don't see them, go under
Edit → Preferences → Automationand enter the path of thequpath-scriptsfolder (e.g.C:\QuPath_Common_Data_0.5\qupath-scripts)
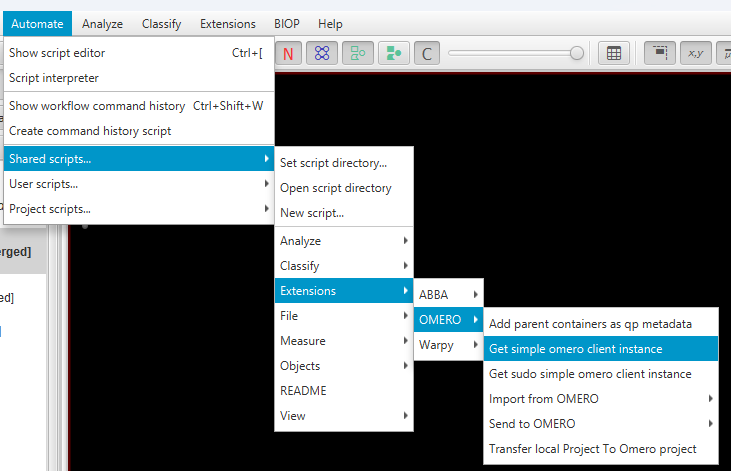
- All commands can be accessed via the class
OmeroRawScripting
To check before running every QuPath-OMERO scripts
1/. A project must be open in QuPath.
2/. The connection toomero-server.epfl.chneeds to be established (with credentials) before running the script.
¶ simple-omero-client library
- simple-omero-client is the simplified API used in all our OMERO-Fiji scripts (see OMERO - Fiji page ).
- The QuPath-OMERO extension is based on this library to communicate with OMERO.
- To get an instance of the simple-omero-client
Client:OmeroRawClient.getSimpleClient().
¶ Example : Send_pathobjects_to_omero.groovy
- In the script header, you will find a REQUIREMENTS and TO MAKE THE SCRIPT RUN section that tell you the different things to do to make the script run.
/*
 * = DEPENDENCIES =
 *  - qupath-extension-biop-omero - latest version : https://github.com/BIOP/qupath-extension-biop-omero/releases
 *
 * = REQUIREMENTS =
 *  - A project must be open in QuPath
 *  - The connection to omero-server.epfl.ch needs to be established (with credentials) before running the script
 *  - The current image should have been imported from OMERO.
 *
 * = TO MAKE THE SCRIPT RUN =
 *  - You need to have some annotations and/or detections on the current image. If it is not the case, create some.
 *  - Run the script.
 *
 *  * = AUTHOR INFORMATION =
 *...
- The code begins by checking if the current image is on OMERO.
This piece of code is necessary to add at the beginning of your own scripts if you want to use QuPath-OMERO command.
// get the current displayed image on QuPath
ImageServer<?> server = QP.getCurrentServer()

// check if the current server is an OMERO server. If not, throw an error
if(!(server instanceof OmeroRawImageServer)){
    Dialogs.showErrorMessage("Sending ROIs","Your image is not from OMERO ; please use an image that comes from OMERO to use this script");
    return
}
- If the image is on OMERO, then all annotations are sent on OMERO
def roisOwner = "" // to get rois from all owners, you can set the owner to empty string, or use Utils.ALL_USERS
boolean showNotif = true

Collection<PathObject> pathObjects = QP.getAnnotationObjects()
boolean wasSent = OmeroRawScripting.sendPathObjectsToOmero(server, pathObjects, deleteROI, roisOwner, showNotif)
- Finally print a small message to tell if annotations sending was successful or not.
// display success
if(wasSent)
    println "ROIs successfully sent to OMERO"
else
    println "An issue occurs when trying to send a ROIs to OMERO"
¶ API (list of available methods)
You can visit this website to get the documentation of each available method for scripting.
In your own scripts, if you use the command
omeroImageData = entry.readImageData()on an imageEntry from OMERO, please do not forget to addomeroImageData.getServer().close()to force close the hidden open server (and release ressources in your OMERO server)