¶ Deprecation warning
This page is no longer up to date.We mostly use Miniforge with Mamba based environments now.
¶ However
Installing 50 different environments that require a particular CUDA version or a particular CuDNN increases the environment size by a few GB, which is kind of frustrating, so we still recommend to actually install the CUDA and CuDNN elements on the PC, and thus skip the mamba install cudaXX steps. That way there is a single CUDA instance for all environments and it saves space...
The rest of this document is taken as is from the migration from C4Science to WikiJS.
¶ Why VENV? Why do you hate Conda, Oli?
I do not hate Conda, it is very useful and powerful, but when it comes to scientific packages and unreleased GPU-based libraries, I find the "black box, it's OK, it's on Conda-Forge" approach lacking.
With venv, the PC itself must be configured properly, which brings an understanding of the underlying dependencies that are installed "magically" with Conda.
I am also comfortable doing this (now) because the GPU technology is at a stage where having multiple CUDA versions and multiple Python versions in parallel is not harmful nor particularly difficult to handle, even outside of Conda. Also I am a masochist, and stubborn.
I also really like that if I mess up, all I have to do is delete the environment folder I created and start again.
Finally, if I need to run a VENV from another process, like a script or Java, it is often more than enough to run the python executable file within the VENV folder. With Conda, you have to mess around with your environment variables, and even then: good luck working it out for each platform.
¶ What this guide will show you
First and foremost, this guide is intended for Windows 10. Linux has enough documentation that I luckily do not need to dive into, as we currently do not have any Linux based workstation at the facility.
You will learn to
- Install and manage multiple versions of Python: 3.7, 3.8 and 3.9
- Install the NVIDIA CUDA libraries for CUDA 10.0, 10.1, 10.2, 11.1, and 11.2 on your PC as well as CuDNN for all these versions
- Install the Microsoft Build Tools for C++ (Ideally just the bare minimum)
- Install NodeJS (For Jupyer Lab)
¶ What can you install with this?
This approach has enabled us to install all with GPU support:
- StarDist with
gputools - CSBDeep
- Noise2Void
- DenoiSeg
- CellPose with PyTorch GPU
- CellProfiler with Cellpose
¶ Installation of all dependencies
This setup is intended for a workstation with a good GPU and Windows 10 Installed. It has been tested with the following cards:
RTX Titan, GTX 1080, GTX 1080 Ti, RTX 2080 Ti
¶ Software to install
- Download Latest NVIDIA Drivers - We use the
Studio Drivers - Download Build Tools for Visual Studio 2019https://visualstudio.microsoft.com/downloads/#build-tools-for-visual-studio-2019) - Install the
Build tools for C++, namely- MSVC v142 - VS 2019 C++ x64/x86 build tools
- Windows 10 SDK (10.0.18362.0)
- [Download CUDA Toolkits](https://developer.nvidia.com/cuda-toolkit-archive Get the Installations for 10.0, 10.1, 10.2, 11.1 and 11.2
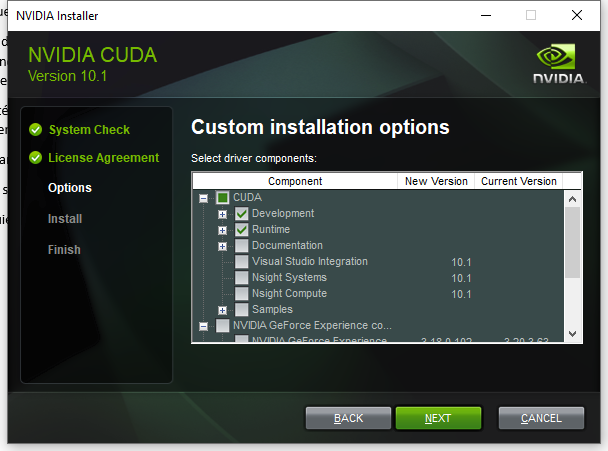
- Install just the
DevelopmentandRuntimeparts

- Install just the
- Download CuDNN
This CuDNN Compatibility chart lets you know what works and what does not work for TensorFlow, which is the most finnicky of the frameworks. PyTorch is much more lenient, it seems.
After you install each CUDA Toolkit, install the appropriate CuDNN. This is how I installed them and why
| CUDA Version | CuDNN Version | Why |
|---|---|---|
| 10.0 | 7.6.5 | TensorFlow 1.13 to 1.15 |
| 10.1 | 7.6.5 | TensorFlow 2.1.0 to 2.3.0 |
| 10.2 | 8.1.1 | PyTorch 1.9 Stable for CellPose |
| 11.1 | 8.1.1 | PyTorch 1.9 Stable for CellPose (More recent) |
| 11.2 | 8.1.1 | TensorFlow 2.5.0 to 2.6.0 (Trials) |
| 11.3 | 8.2.1 | PyTorch 1.10 for CellPose and Omnipose |
- Install Python 3.7 Install for all users, and make sure that you also install the Python version manager
pywhen prompted. - Install Python 3.8 This one is necessary for CellProfiler, for example
- [Install Python 3.9](https://www.python.org/downloads/release/python-396/| Install Python 3.9) Bleeding Edge Version You're already doing all this, so why not continue?
- Install NodeJS - Install all defaults. This is for adding extensions to Jupyter Lab.
¶ Environment Variables needed for compiling
Environment Variables are file and folder locations your operating system looks into when you call a program or library. It is like the index of a library, telling you where to look for different things.
In Windows, we can create and edit Environment Variables graphically.
- Start typing "Environment" in the Windows searchbar until it suggests "Edit the system environment variables".
- Click on {nav Environment Variables...} and use the {nav New...} button all the way down (The one that corresponds to the "System Variables") to create the two following environment variables.
| VARIABLE NAME | Path (Default) |
|---|---|
| INCLUDE | C:\Program Files\NVIDIA GPU Computing Toolkit\CUDA\v10.1\include |
| LIB | C:\Program Files\NVIDIA GPU Computing Toolkit\CUDA\v10.1\lib\x64 |
These are needed for compiling PyOpenCL, which is a dependency of gputools for StarDist, but is beneficial for any other tools that use the GPU and may need compiling.
You will need to click on
New...for each Environment Variable you create.
If you are compiling something else that isn't StarDist that needs a different version of CUDA, you NEED to change the INCLUDE and LIB paths before compiling based on your tool's needs. After it is compiled, it will run no matter what these paths are. They are only needed at compiling. Did I mention compiling is the only time these environment variables are needed?
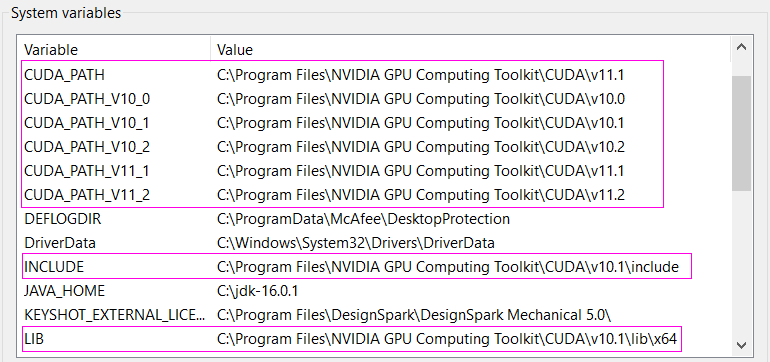
In the end it should look like this:

Remark that the CUDA_PATH is set to CUDA 11.1 because that is the last one that I installed. This is not important for the steps below, so do not worry about it.
¶ Choosing your Python version
Because you have multiple Python versions, you can check which are available with the py --list command.
C:\Users\demo>py --list
Installed Pythons found by py Launcher for Windows
 -3.9-64 *
 -3.8-64
 -3.7-64
So if we need to create a venv for python 3.7, we can write
py -3.7 -m venv d:\my-new-venv-py37
When activating the environment using d:\my-new-venv-py37\Scripts\activate
We will have Python 3.7 backing it.
¶ Creating Virtual Environments
Consider upgrading
pipto the latest vesion before starting:python -m pip install --upgrade pip
¶ Windows Command Prompt cmd
IMPORTANT: We are running all the commands below from the Windows Command Prompt. Access it using {key Win R}, type cmd and hit enter.
¶ StarDist with TensorFlow 1.15
We are going to create a env-stardist-tf15 environment in the D:\ drive using python 3.7
From your command prompt:
d:
py -3.7 -m venv env-stardist-tf15
env-stardist-tf15\Scripts\activate
Checkpoint: Ensure the right python version is installed using
where pythonand you should have a result like belowD:\env-stardist-tf15\Scripts\python.exe C:\Users\oburri\AppData\Local\Programs\Python\Python37\python.exe C:\Users\oburri\AppData\Local\Microsoft\WindowsApps\python.exe
Finally, we can install all of StarDist using the stardist.txt file below
stardist.txt
pip install -r stardist.txt
Install tensorboard for Jupyter Lab
jupyter labextension install jupyterlab_tensorboard
¶ Noise2Void with TensorFlow 1.15
The latest N2V no longer supports TF1.15, but because we need compatibility with Fiji, we force the version of N2V to be 0.2.1 as per their documentation. that version is defined in the n2v.txt file below.
We are going to create a env-noise2void-tf15 environment in the D:\ drive using Python 3.7
Start a command prompt and type
d:
py -3.7 -m venv env-noise2void-tf15
env-noise2void-tf15\Scripts\activate
Finally, we can install all of Noise2Void using the n2v.txt file below
n2v.txt
pip install -r n2v.txt
Install tensorboard for Jupyter Lab
jupyter labextension install jupyterlab_tensorboard
¶ CellPose
We are going to create a env-cellpose-torch19 environment in the D:\ drive using python 3.8 (This version is useful if you want to use CellProfiler too for example)
Start a command prompt and type
d:
py -3.8 -m venv env-cellpose-torch19
env-cellpose-torch19\Scripts\activate
We can install all of Cellpose using the cellpose.txt file below
cellpose.txt
pip install -r cellpose.txt
¶ Cellpose with GPU
As per the current documentation , we need to uninstall the torch module and pick the right one for our CUDA version.
Here we installed CUDA 11.1 with CuDNN 8.1.1 as per the initial steps at the start of this guide.
pip uninstall torch
pip install torch==1.9.0+cu111 -f https://download.pytorch.org/whl/torch_stable.html
That last line is obtained from the PyTorch webiste directly
¶ Cellpose 0.6.5 / 0.7.2
As per the current documentation , we need to uninstall the torch module and pick the right one for our CUDA version.
Here we installed CUDA 11.3.1 with CuDNN 8.2.1 as per the initial steps at the start of this guide.
pip uninstall torch
pip install torch==1.10.0+cu113 -f https://download.pytorch.org/whl/torch_stable.html
¶ DenoiSeg
Denoiseg has very few dependencies, so we do not need a requirements file
d:
py -3.7 -m venv env-denoiseg-tf15
env-denoiseg-tf15\Scripts\activate
pip install tensorflow-gpu==1.15 keras=2.2.5 jupyterlab jupyter-tensorboard denoiseg
jupyter labextension install jupyterlab_tensorboard
¶ 'venv' Information & Examples
Notice how we always use
Scripts\activatebefore running any pip commands. Theactivatecommand ensures that we are running within the virtual environment, likeconda activate. To confirm you are running in the virtualenv, its name should be in parentheses on the left of the command prompt.
You should not have your Notebooks/Code in the same folder as your
virtualenv. Avirtualenvis a folder which contains the libraries and executables to create an environment for you to run your code.
It is independent.
Keeping your scripts in the same folder would be like storing your Excel results inC:\Program Files\Microscoft Office.
¶ Example: Activating env-stardist-tf15 and running JupyterLab in your project folder
To start JupyterLab in your folder, do the following from the command prompt
d:\env-stardist-tf2\Scripts\activate
cd /d "E:\My Project"
jupyter lab
¶ Creating a shortcut to activate your virtualenv
¶ Example with Noise2Void
You can create a Run Noise2Void.bat file that you can keep somethere in your project folder that does this automatically. The syntax is a little different than above.
Copy paste the code below into the file you just created. Adjust paths as needed.
call d:\env-noise2void-tf15\Scripts\activate
cd /d "E:\My Project"
call jupyter lab
¶ Example with StarDist
You can create a Run StarDist-TF2.bat file that you can keep somethere in your project folder that does this automatically.
Copy paste the code below into the file you just created. Adjust paths as needed.
call d:\env-stardist-tf2\Scripts\activate
cd /d "E:\My Project"
call jupyter lab
