There are several ways to add annotations to objects in OMERO. You can add annotations using the OMERO webclient interface to any object(s) that you can select in the left-hand-side tree or central pane, this means Project, Dataset, Image, Screen, Plate and Well.
When an image is uploaded to OMERO, the original filename, including its extensions and the path from which it was uploaded, is preserved. It is common for useful metadata to be encoded into the filenames and paths of data. In order to make use of this metadata for searching and organising the data, the Auto-tagger web plugin enables it to be added as tags annotation.
¶ Terminology
- Tag: an OMERO text annotation
- Token: a section of text which has been automatically parsed from the filename after splitting up the filename by a space, period or underscore. e.g. token1_token2_token3.dv or token3 token4.dv or token5.token6.dv
- Mapping: selecting a certain tag to correspond to a certain token, e.g. the tag “Deconvolved” might be created from a token “Deconvolved”.
¶ Tags
¶ Adding tags manually
- Select one or several images from the web client
- Select the
Generaltab from the right-hand pane. - Expand the
Tagsharmonica in the right-hand pane - Click on the
+button.
- Select tags from your available tags (pipeline a) or create new ones (pipeline b). Available tags are coming from all users affiliated to your group.
- Click on the
right arrowOR on theAddbutton if you have created a new tag.
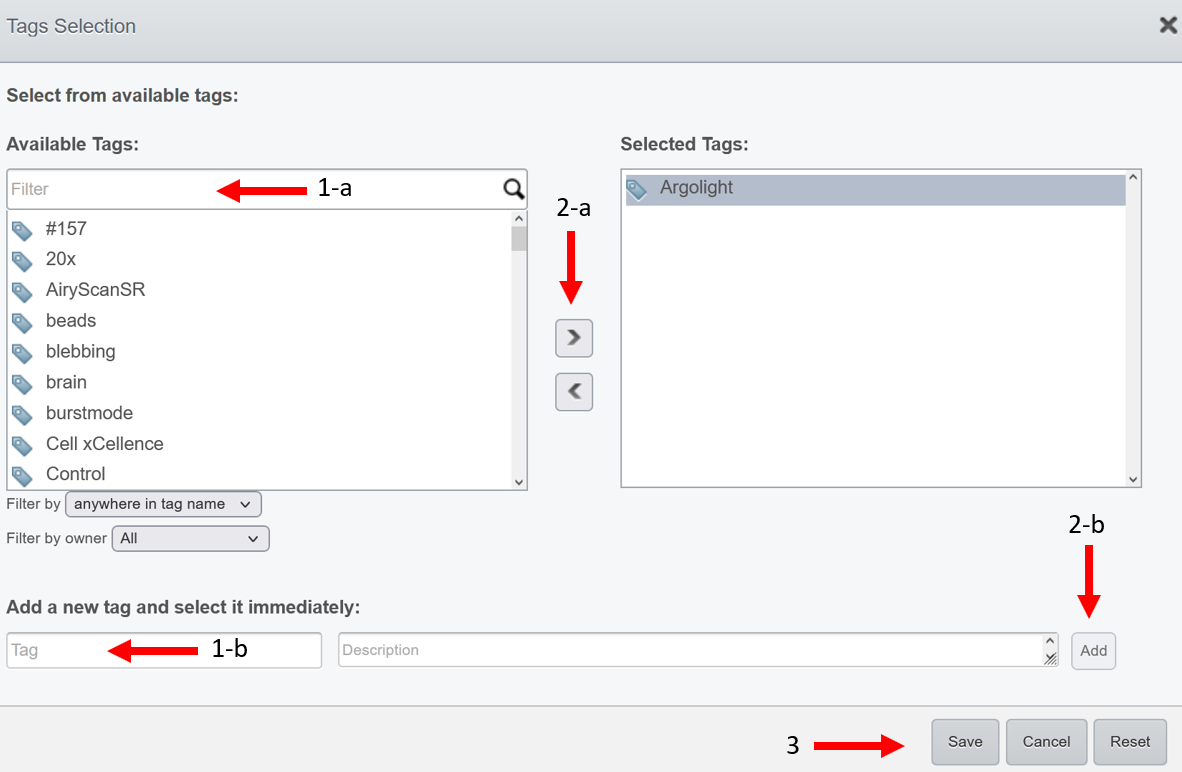
- Click on the
Savebutton.
¶ Tag sets
Tags can also be organized in tag sets, i.e tag containers that gather different tags. If you select a tag set when adding tags to an omero object (image, project, dataset..), the corresponding object will be tagged with all tags contained in the tag set.
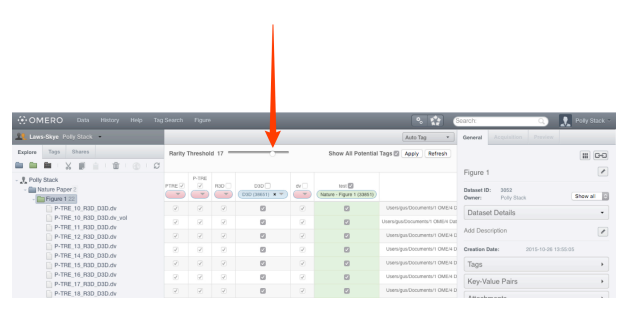
¶ Tagging data using the auto-tagger
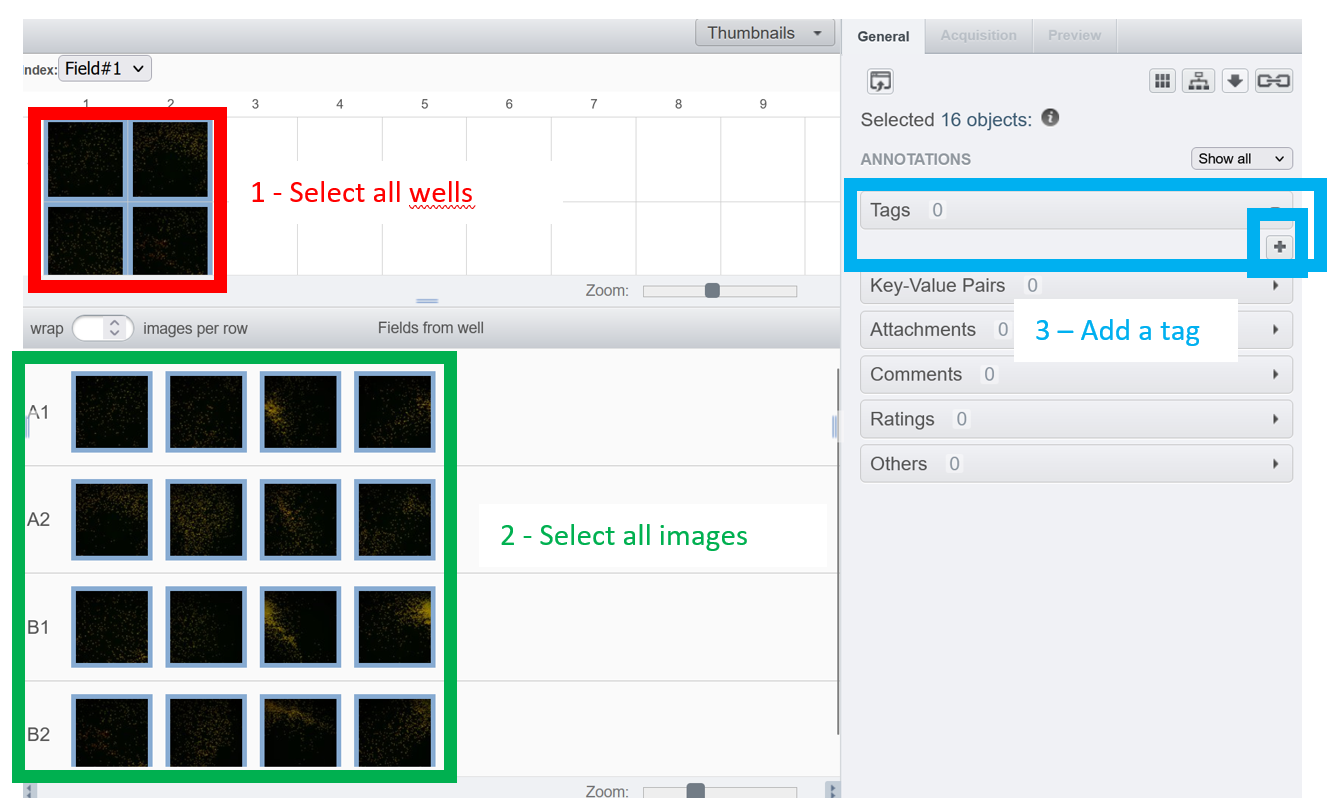
The autotagger is not available for screens/plates. To batch tag images within a plate, you can either
1 -- Select all wells --> Select all images --> add manually a tag to all selected images at once
2 -- Use a script to annotate all your images (example of scripts are given on our github )
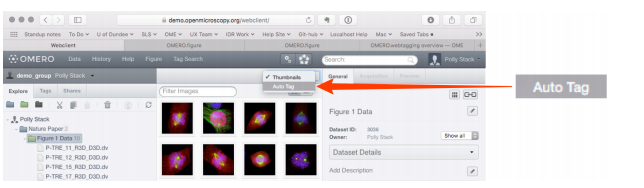
- Select a dataset or image(s) in the data tree.
- Select
Auto Tagfrom the view menu in the centre pane toolbar.
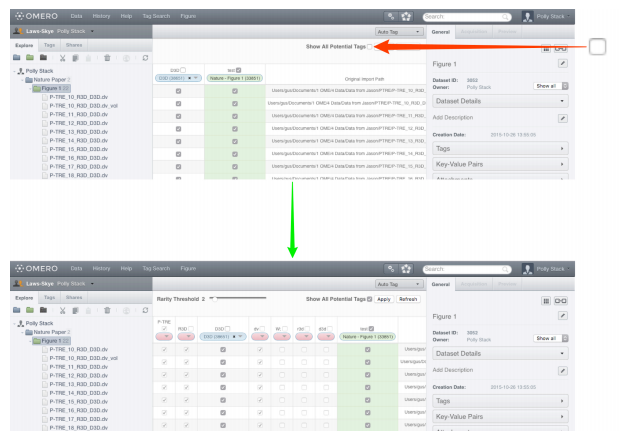
-
Columns, headed with a token name, are displayed in the centre pane, with a row representing each image in the dataset.
-
The initial display shows only existing tags, either already attached to images or not attached but matching a token.
-
If an image already has a tag applied to it, or if the token for a column is present in this image, checkboxes in the rows are auto-selected.
-
A green background in a cell indicates the image has that tag applied to it.
-
Select the
Show All Potential Tagscheckbox to generate columns for tokens from the filename path and extensions.
-
The drop-down buttons in the headers of the columns are colour-coded as:
- Pink (empty drop-down button) - indicating a token which did not match any existing tags in the system, or there were multiple matching tags and there was no way to make a determination as to which was intended.
- Blue (tag name in drop-down) - indicating a token which matched exactly one existing tag and has been automatically mapped to this tag. Blue columns are also shown when the user manually applies a mapping.
- Green (tag name in drop-down) - indicating a tag which is already applied to some images in this dataset, but does not match any of the tokens.
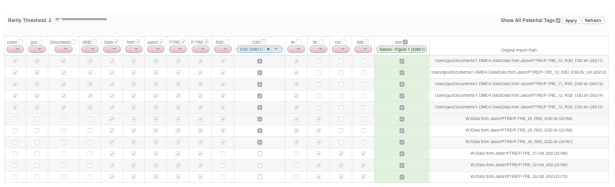
- The default Rarity threshold setting is 2. Use the Rarity Threshold slider to adjust the threshold to a higher value to refine the display of tokens according to how commonly they were detected on images.
Note: there is a default list of separators which are used to split the tokens. If your separator is not in this list, you can add it.
- Click on a pink drop-down to add a suggested tag.
- Select
New/Existing Tag. - Edit or accept suggested tag name.
- Add a description if required.
- Click
OK.

- Once happy with the suggestions indicated by the boxes ticked in the centre pane, Click on the
Applybutton to save the changes and attach the tags to the images - If you are not happy, click on the
Refreshbutton to reset the table to its original state without applying changes.
If you add some images in a current dataset, you can still use auto-tagger to add the same tags as other images or other tags. It will not duplicate tags for existing images.
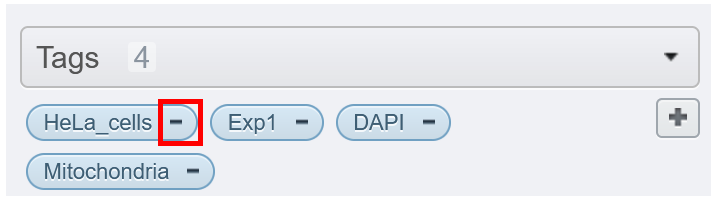
¶ Unlinking a tag
If you want to remove a tag from an image, click on the minus, on the left part of the tag. It will unlink this tag from the current selected image(s) but it will not delete it (i.e. other image with the same tag will still have this tag).
¶ Deleting a tag
To delete a tag
- Click on the tag
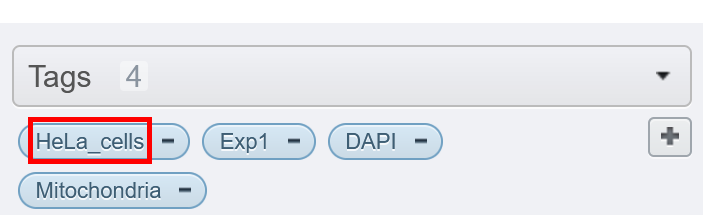
- A list of tags appears on another page
- Right-click on the tag you want to delete
- Select delete
Important : if you delete a tag, all images/datasets tagged with it will NOT BE TAGGED anymore

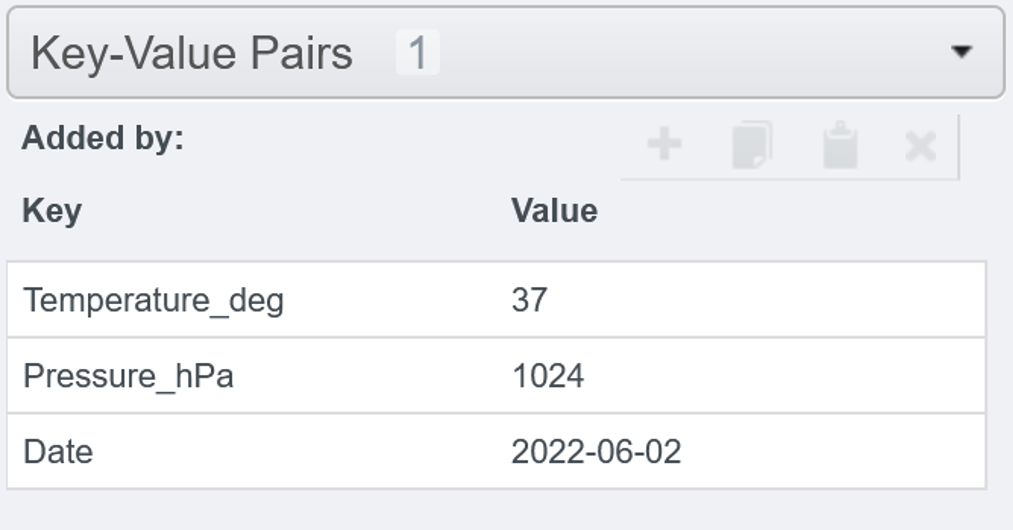
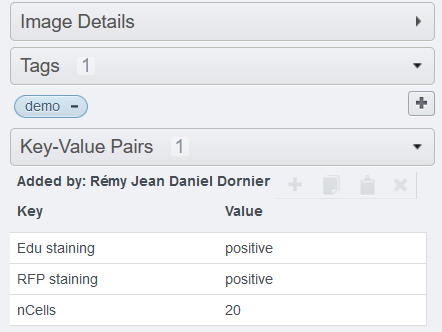
¶ Key-value pairs
The Key-Value pairs can be used for adding lab-book-like metadata (e.g experimental conditions) to your images. Key-Value pairs are also searchable and can be filtered.
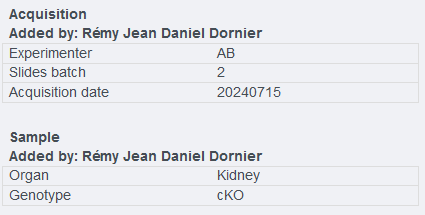
¶ Namespace - definition
A namespace is like a labeled box, inside which you can add some KVPs. The goal of having different namespaces is to sort and group KVPs (i.e. metadata) which refer to the same "category", for better readability.
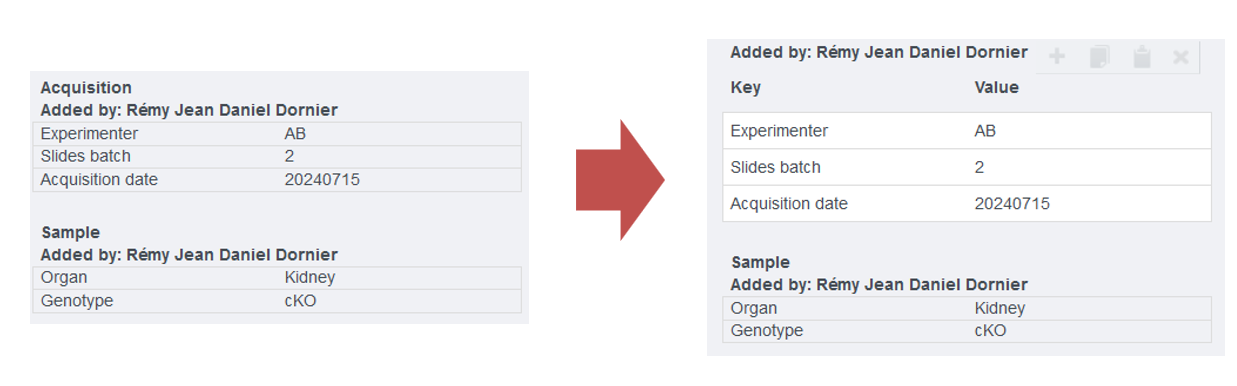
In the image below, the KVPs have been divided into 2 different namespaces : Acquisition and sample
¶ Adding manually
When adding manually the KVPs, there is no possibility to assign a custom namespace. All KVPs will land in the default namespace. In order to convert the namespace later, please have a look to the next section Converting namespace.
- Select an Image from the web client.
- Select the
Generaltab from the right-hand pane. - Expand the
Key-Value Pairsharmonica in the right-hand pane - Click on the
+button. - Enter your key-value in the dedicated fields.
Important : The names you put for keys and values should ONLY be tokenised using underscores or dashes and tokens should NOT CONTAIN any special characters.
¶ Adding in batch, from a csv file
- It is possible to batch-annotate any kind of containers/images or its child with key-value pairs AND tags, using a formatted csv file.
A full documentation, including of some scripts that are not deployed, can be found on this GitHub page
¶ Exporting the list of images/containers
This is a mandatory step to get the image name and ID.
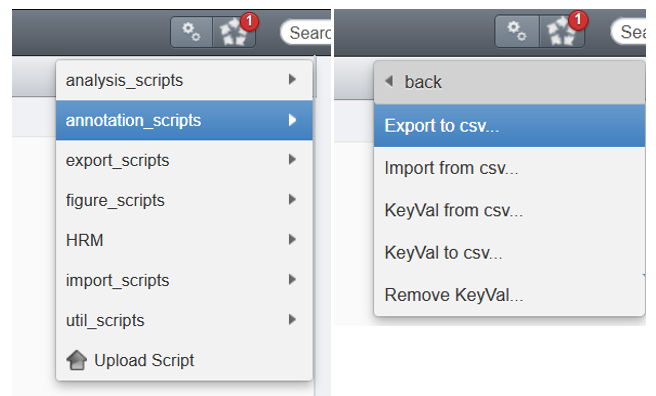
- Select the dataset(s)/project(s)/plate(s)/screen(s) you want to process
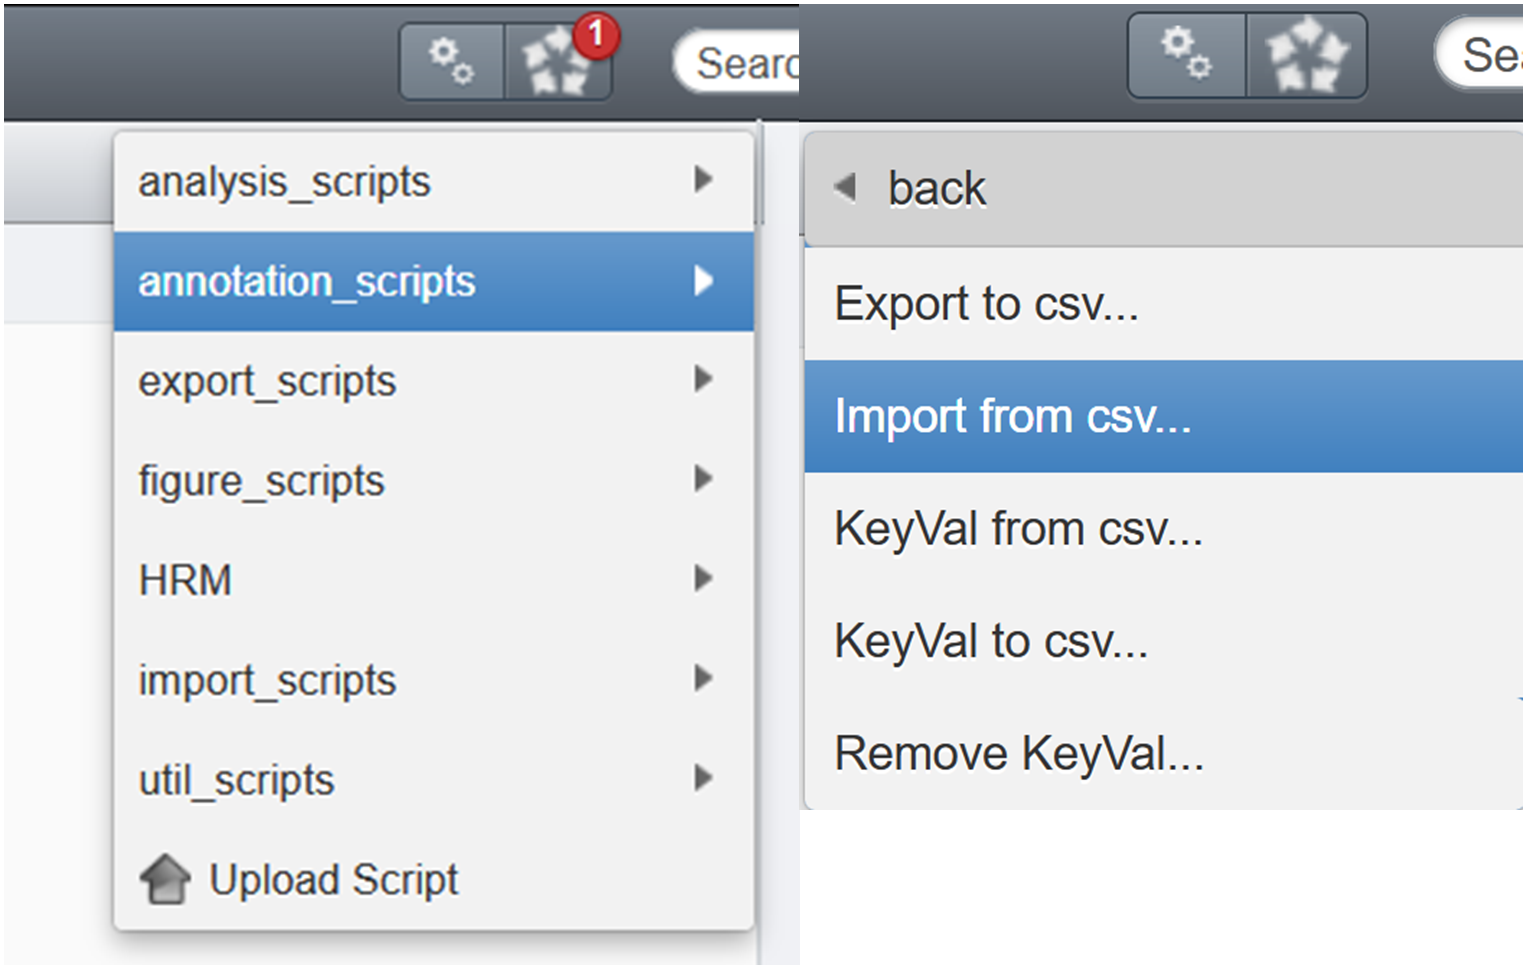
- Click on the general gears
- Click on the folder
annotation scripts - Select
Export to csv...
- Fill the GUI
Hint : if you pass the mouse over each field, a small explanation pops-up
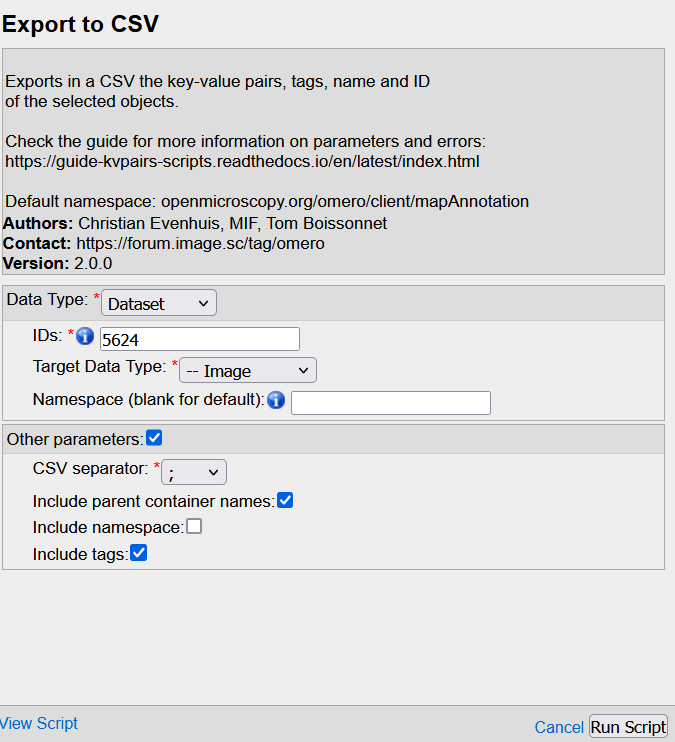
Data type: Parent container to processIDs: OMERO Id of the parent(s). For multiple parents, write each Id separated by ONLY a commaTarget data type: Data to process WITHIN the parent containerNamespace: leave blankCSV separator: Choose the one which DOESN'T OVERLAP with the image names (ex: if the image names contain a comma,like for .vsi files, then select a semi-colon;or tabInclude parent conatiner names: OPTIONNAL : check the box if you want to print the parent container in the CSV file.Include namespace: OPTIONAL : check the box if you want to print the KVPs namspace. If you don't have any custom namespace, it is not necessary to check it.Include tags: OPTIONNAL check the box to print the tags attached to each images. We recommend that you check this box in order to have a template column in you wish to add new tags to your images
- Click on Run. The .csv file will be generated and attached to the parent container(s)
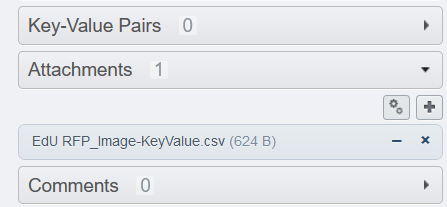
- Download the newly created file (click on the corresponding file under
attachements) - Delete the file by clicking on the cross.
It is not necessary to keep this file as it represents a dupliaction of information and takes some useless space in the database.

¶ Editing the csv file with new entries
- Open the csv file in excel
Hint: if Excel doesn't parse automatically the separator you selected before, close Excel and open the csv file with a text editor (ex:
notepad++,text edit). Add a new line at the very beginning of the file withsep=followed by the separator.
-- for coma : "sep=,"
-- for semi-colon : "sep=;"
-- for tab : "sep="
- The first columns
OBJECT_ID,OBJECT_NAMEshould never be modified - The key-values are printed in the next columns (
keyin the header line,value` in the rest of the column) - The tags are printed in the columns
TAG.
- Delete all the columns of key-values and tags. If you don't clean them, they will be added again.
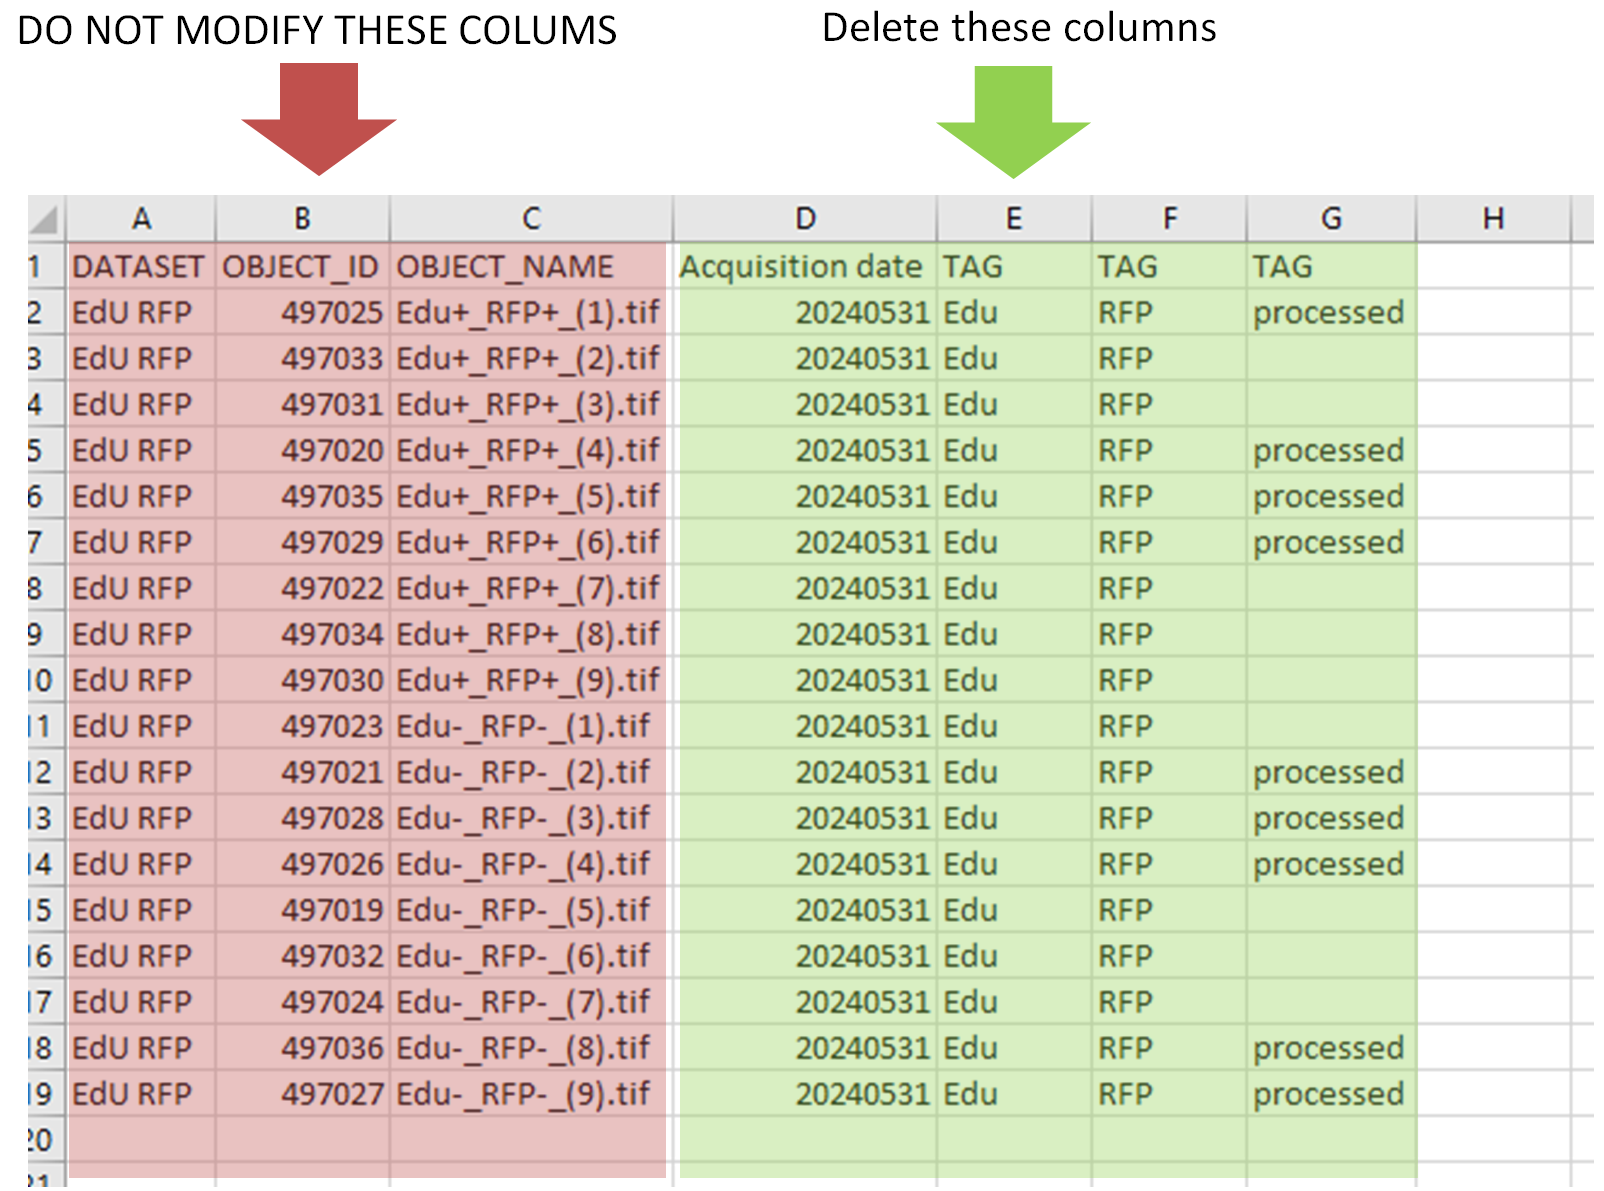
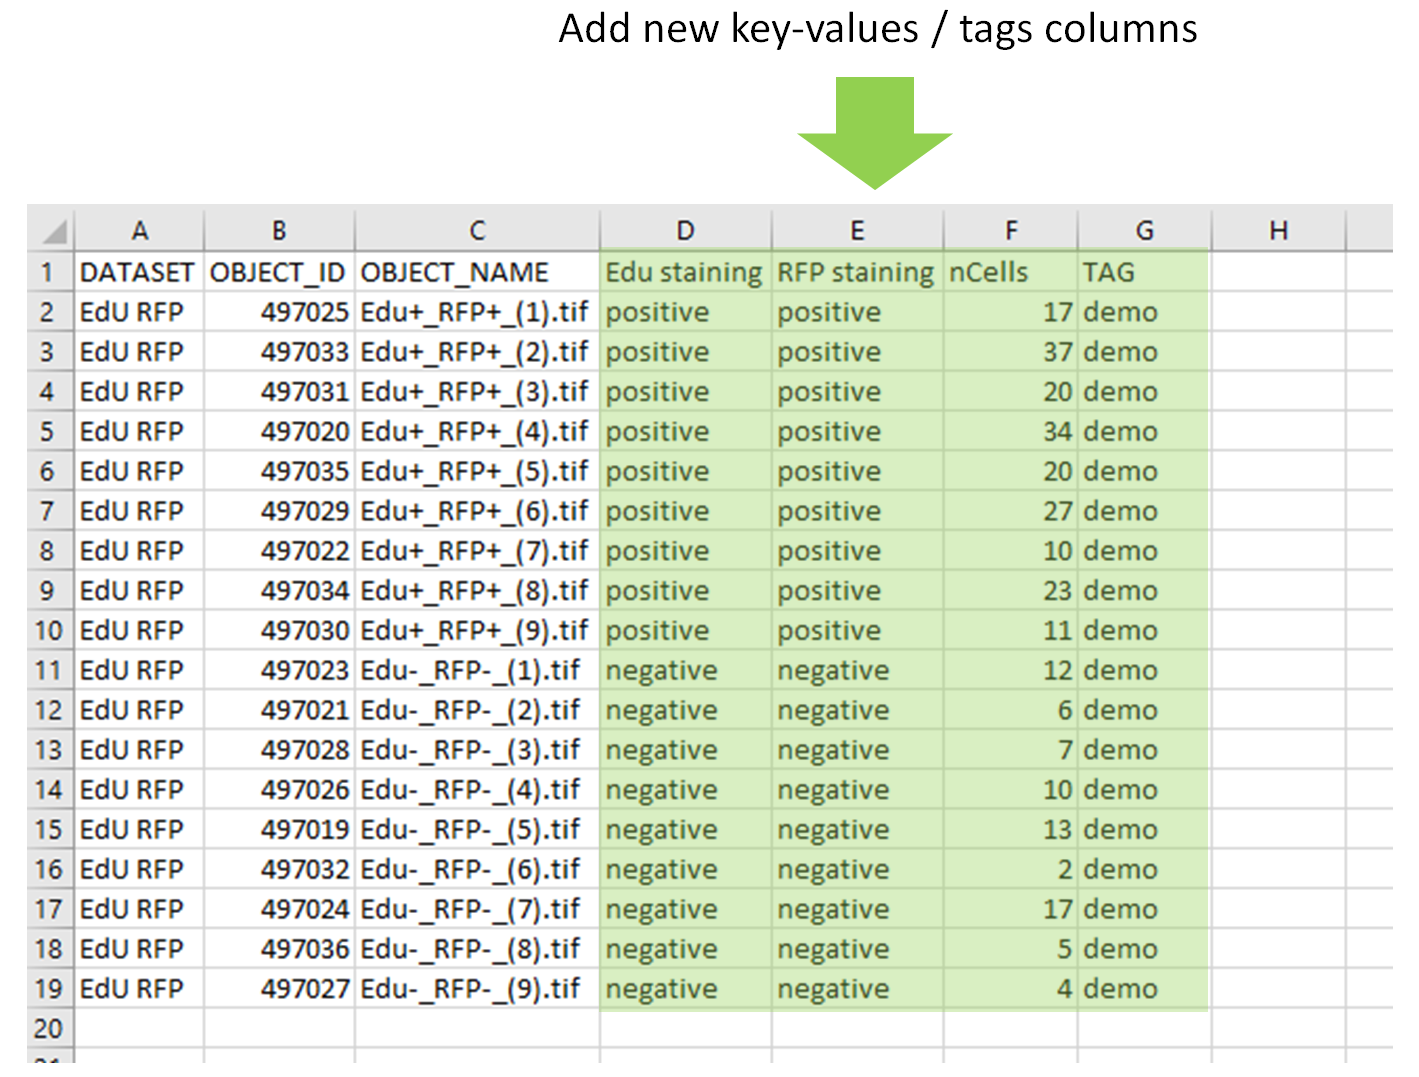
- Add one new column per key-value & tag you to add. For the tag column, the tags written in it can be different for each image.
- Save the file.
¶ Importing back key-values and tag
- Select the dataset(s)/project(s)/plate(s)/screen(s) you want to process
- Click on the general gears
- Click on the folder
annotation scripts - Select
Import from csv...
- Fill the GUI
Hint : if you pass the mouse over each field, a small explanation pops-up
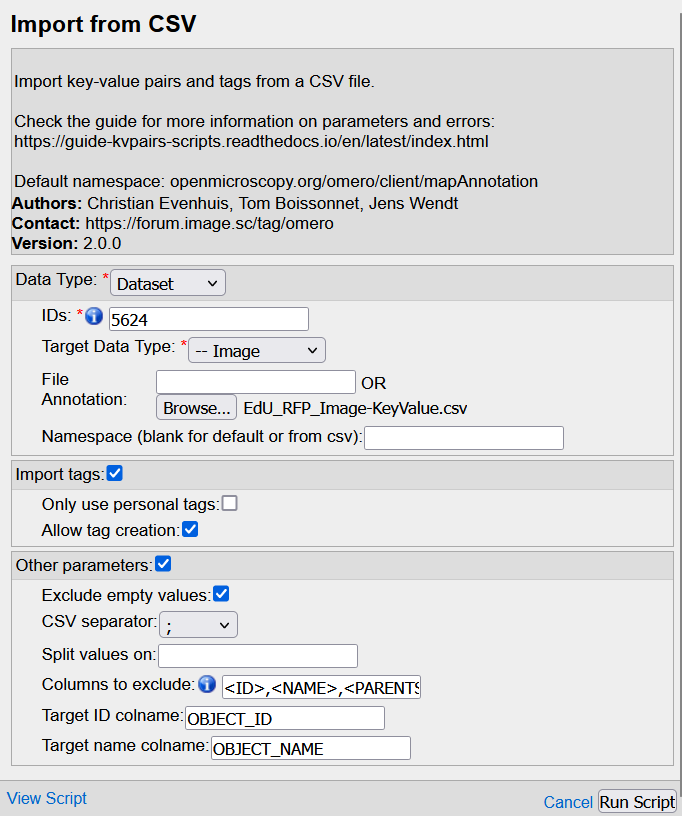
Data type: Parent container to process --> same as the one selected for the exportIDs: OMERO Id of the parent(s) --> same as the one(s) selected for the exportTarget data type: Data to process WITHIN the parent container --> same as the one selected for the exportFile Annotation: Browse and choose the csv file you've just editedNamespace: leave blankImport tags: Check the box if you have tags to addOnly use personal tags: Never check the boxAllow tag creation: Check the box. It will create a new tag in OMERO if the tag doesn't exist yet
Leave all the other boxes/fields as they are, with default options.
- Click on Run. The .csv file will be generated and attached to the parent container(s) and the images will be annotated with tags and key-values
¶ Converting namespace
Converting namespaces has two main advantages
- modifying the KVPs
- Changing the name of the namespace
To be able modify, in the webclient, the KVPs, you'll need to convert from
Your_namspaceto the default namespace.
In the webclient, you can run a script that does the conversion for you.
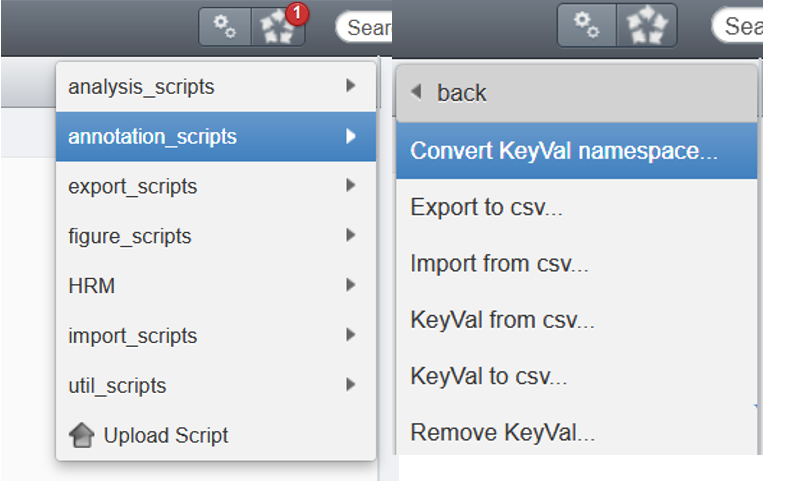
- Select the dataset(s)/project(s)/plate(s)/screen(s) you want to process
- Click on the general gears
- Click on the folder
annotation scripts - Select
Convert KeyVal namespace...
- Fill the GUI
Hint : if you pass the mouse over each field, a small explanation pops-up
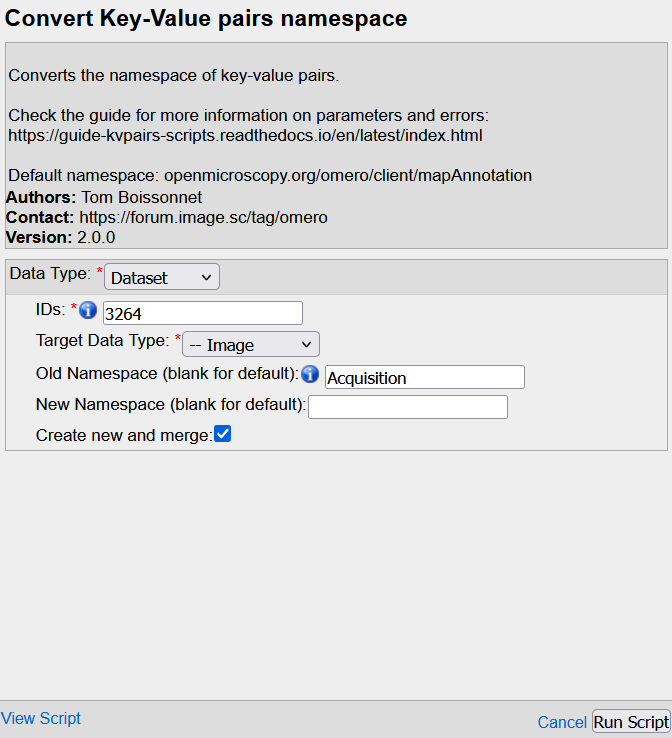
Data type: Parent container to process --> same as the one selected for the exportIDs: OMERO Id of the parent(s) --> same as the one(s) selected for the exportTarget data type: Data to process WITHIN the parent containerOld namespace: the name of the source namespace(s) (the one you want to convert)New Namespace: the name of the targeted namespace(s). Leave it blank for the default namespace.Create new and merge: Check the box to merge all KVPs within theNew Namespaceunder the same enetity
- The namespace is then converted.
¶ Removing Key-values
¶ Removing manually
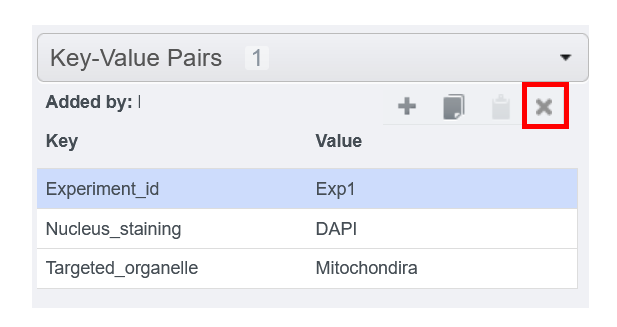
To remove key-value
- Click on the line you want to delete
- Click on the cross on the top-right corner
¶ Removing in batch
In the webclient, you can run a script that helps you deleting KVPs in batch.
Be careful : the script will delete ALL KVPs that are part of the SPECIFIED NAMESPACE. Please, check your KVPs before running this script. Deleted KVPs cannot be retrieve back.
- Select the dataset(s)/project(s)/plate(s)/screen(s) you want to process
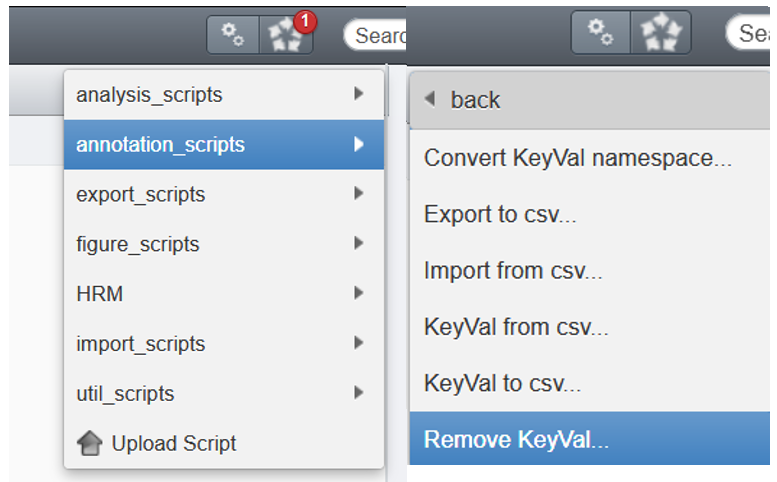
- Click on the general gears
- Click on the folder
annotation scripts - Select
Remove KeyVal...
- Fill the GUI
Hint : if you pass the mouse over each field, a small explanation pops-up
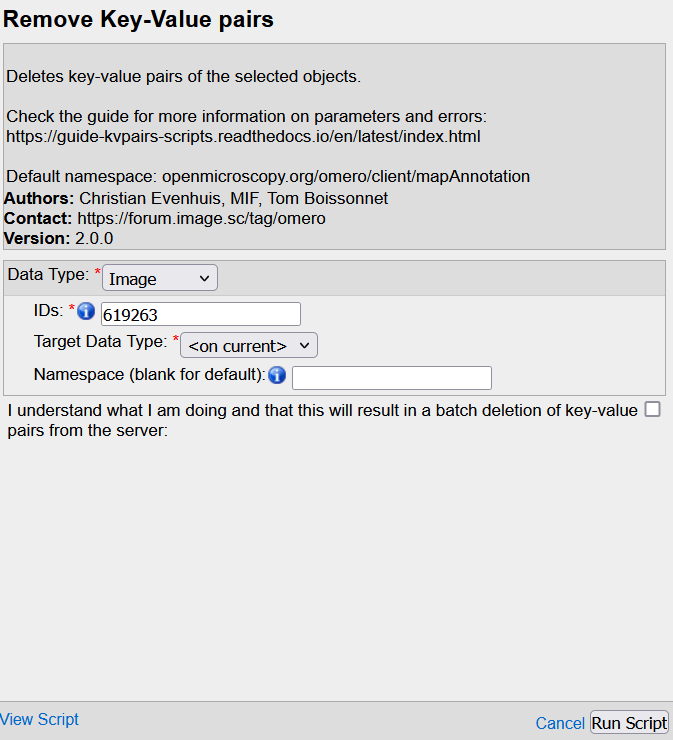
Data type: Parent container to process --> same as the one selected for the exportIDs: OMERO Id of the parent(s) --> same as the one(s) selected for the exportTarget data type: Data to process WITHIN the parent containerNamespace: the name of the namespace(s) you want to clean the KVPs fromI understand...: Check the box
- All KVPs from the specified namespace(s) are deleted.
¶ Attachments
¶ Adding an file
- Select one or more objects in the left-hand side tree, such as Dataset, Project or Image.
- Select the
Generaltab from the right-hand pane. - Expand the
Attachmentsharmonica in the right-hand pane - Click on the
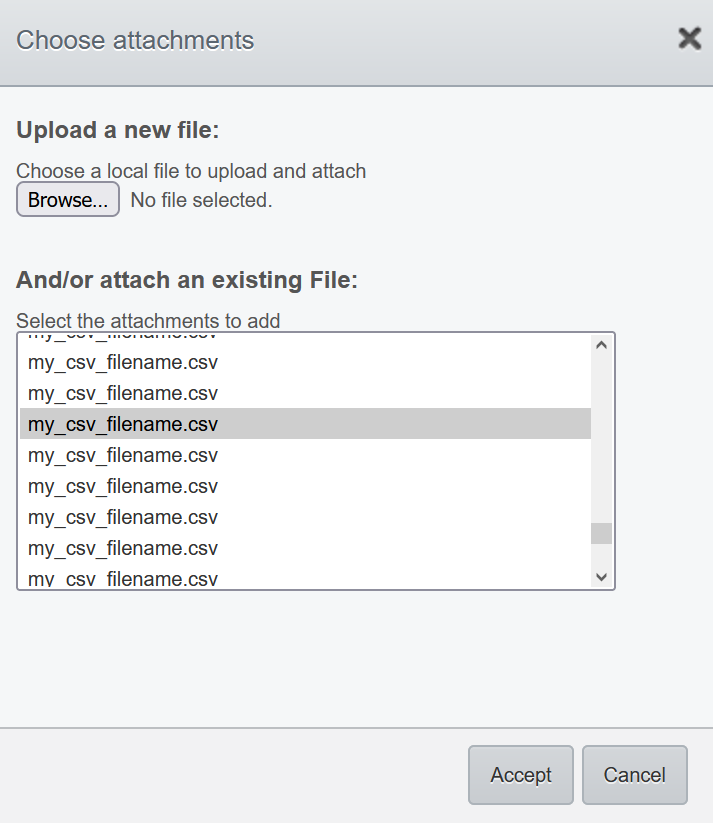
+button. - Select an existing file (i.e. already imported on OMERO.server) or import a new file. You can attach any type of file as an attachment. If you select a file from your local filesystem using the Browse button, the file will be uploaded to the OMERO.server and linked to your Omero object
- The content of .pdf, .csv and plain text files is also searchable in OMERO.
NOTE : It is not possible to rename an attachment on OMERO. Check the attachment name BEFORE importing it on OMERO.
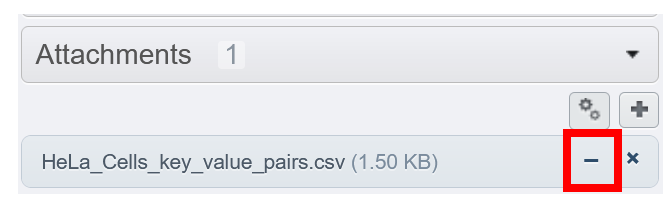
¶ Unlinking a file
- Clicking on the
minus signjust unlinks the File Attachment from the selected object(s). The File Attachment is not deleted from the server (it becomes an orphan file).
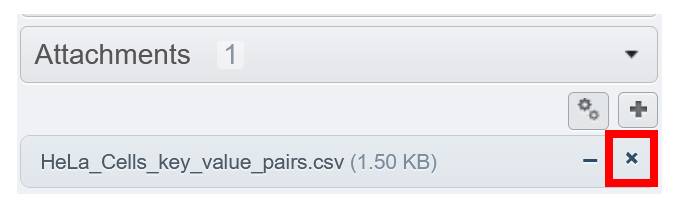
¶ Deleting a file
If deletion is needed, click on the cross icon instead of the minus icon.
Be Careful : When you delete a file, all instances of this particular file, linked to images/datasets... will be also deleted.
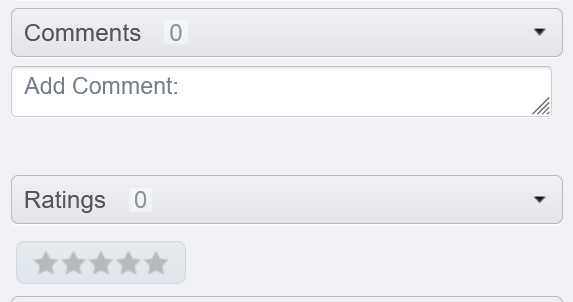
¶ Others
- You can add Comments and Ratings to any Omero object. To do so, follow analogous steps to the ones descirbed above for Tags, Key-Value pairs and File Attachments.